心灵鸡汤
收起你的懦弱,摆出你的霸气,在你跌倒的时候没人扶你,多得是看你笑话的畜生
# 一:多线程技能
.java 程序编译后形成 *.class 文件,在 Windows 中启动一个 JVM 虚拟机相当于创建了一个进程,在虚拟机中加载 class 文件并运行。每执行一次 main() 方法就创建一个进程,其本质上就是 JVM 虚拟机进程。
单任务的特点就是排队执行,即同步,就像在cmd中输入一条命令后,必须等待这条命令执行完才可以执行下一条命令。在同一时间只能执行一个任务,CPU利用率大幅降低,这就是单任务运行环境的缺点。
多任务的特点是在同一时间可以执行多个任务,这也就是多线程技术的有点。使用多线程也就是在使用异步。
在什么场景下使用多线程技术?
1)阻塞。一旦系统中出现了阻塞现象,则可以根据实际情况来使用多线程技术提高运行效率。
2)依赖。业务分为两个执行过程,分别是A和B。当A业务发生阻塞情况时,B业务的执行不依赖A业务的执行结果,这时可以使用多线程技术来提高运行效率;如果B业务的执行依赖A业务的执行结果,则可以不使用多线程技术,按顺序进行业务的执行。
# 1.1 线程创建
方式一:继承Thread类
public class FirstThread extends Thread {

    private int i;

    public void run() {
        for (; i < 5; i++) {
            // 当线程类继承Thread类时,直接使用this即可获取当前线程
            System.out.println(getName() + " " + i);
        }
    }

    public static void main(String[] args) {
        // 调用 Thread 的 currentThread() 方法获取当前线程
        System.out.println(Thread.currentThread().getName());
        new FirstThread().start();
        new FirstThread().start();
    }
}
2
3
4
5
6
7
8
9
10
11
12
13
14
15
16
17
18
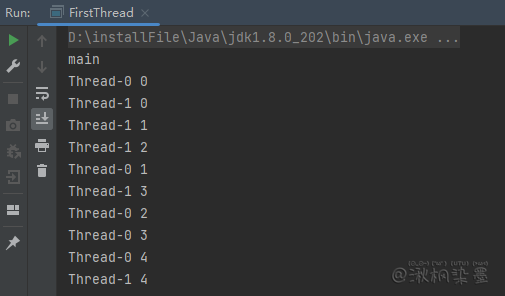
如果多次调用 start() 方法,则出现异常 Exception in thread "main" java.lang.IllegalThreadStateException
执行 start(),方法的顺序不代表线程启动的顺序。
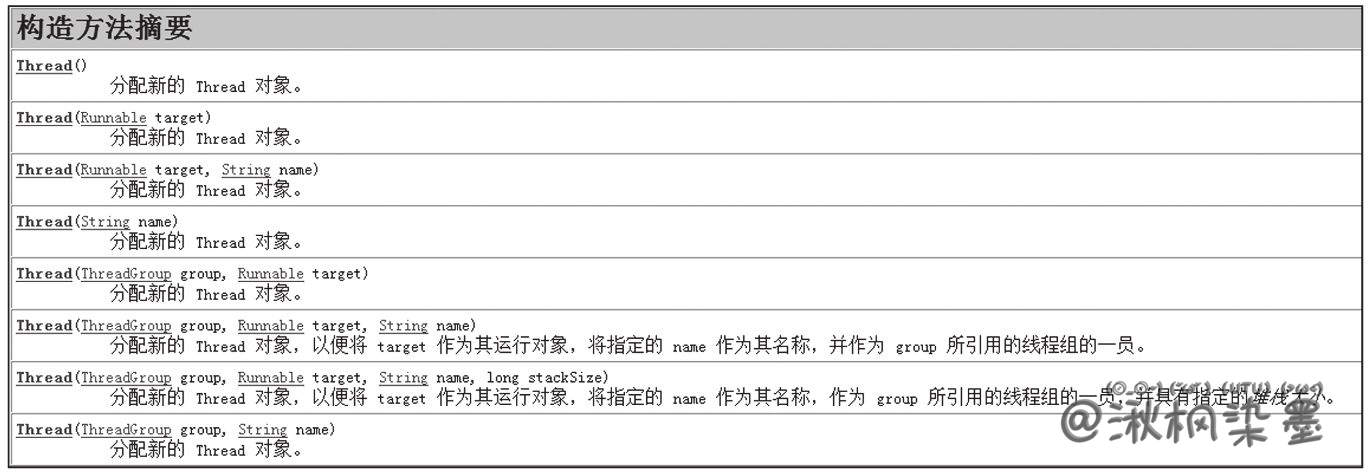
方式二:实现Runnable
public class SecondThread implements Runnable {

    private int i;

    public void run() {
        for (; i < 5; i++) {
            // 当线程类实现 Runnable 接口时
            // 如果想获取当前线程,只能用 Thread.currentThread() 方法
            System.out.println(Thread.currentThread().getName() + " " + i);
        }
    }

    public static void main(String[] args) {
        SecondThread st = new SecondThread();
        new Thread(st, "线程1").start();
        new Thread(st, "线程2").start();
    }

}
2
3
4
5
6
7
8
9
10
11
12
13
14
15
16
17
18
19
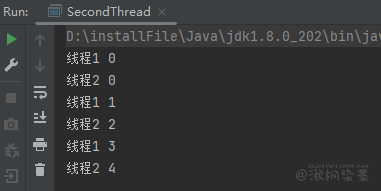
方式三:Callable和Future
Callable 接口提供了一个 call() 方法可以作为线程执行体,该方法可以有返回值,可以声明抛出异常。该方法并不是直接调用,它是作为线程执行体被调用的。使用 Future 接口来代表 Callable 接口里的 call() 方法的返回值,并为 Future 接口提供了一个 FutureTask 实现类,该实现类实现了 Future 接口,并实现了 Runnable 接口 —— 可以作为 Thread 类的 target。
在 Future 接口里定义了如下几个公共方法来控制关联的 Callable 任务。
boolean cancel(boolean mayInterruptIfRunning):试图取消该 Future 里关联的 Callable 任务V get():返回 Callable 任务里 call() 方法的返回值。调用该方法将导致程序阻塞,必须等到子线程结束后才会得到返回值。V get(long timeout, TimeUnit unit):返回 Callable 任务里 call() 方法的返回值。该方法让程序最多阻塞 timeout 和 unit 指定的时间,如果经过指定时间后 Callable 任务仍然没有返回值,将会抛出 TimeoutException 异常。boolean isCancelled():如果在 Callable 任务正常完成前被取消,则返回 true。boolean isDone():如果 Callable 任务已完成,则返回 true。
public class ThirdThread {

    public static void main(String[] args) {
        FutureTask<Integer> task = new FutureTask<>(() -> {
            int i = 0;
            for (; i < 5; i++) {
                System.out.println(Thread.currentThread().getName() + " 的循环变量i的值:" + i);
            }
            return i;
        });
        new Thread(task, "有返回值的线程").start();
        try {
            System.out.println("子线程返回值:" + task.get());
        } catch (InterruptedException | ExecutionException e) {
            e.printStackTrace();
        }
    }

}
2
3
4
5
6
7
8
9
10
11
12
13
14
15
16
17
18
19
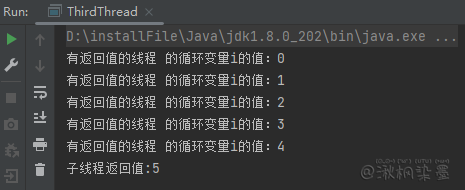
采用实现Runnable、Callable 接口的方式创建多线程的优缺点:
线程类只是实现了 Runnable 接口或 Callable 接口,还可以继承其他类。
在这种方式下,多个线程可以共享同一个 target 对象,所以非常适合多个相同线程来处理同一份资源的情况,从而可以将 CPU、代码和数据分开,形成清晰的模型,较好的体现了面向对象的思想。
劣势是,变成稍稍复杂,如果需要访问当前线程,则必须使用 Thread.currentThread() 方法
采用继承 Thread 类的方式创建多线程的优缺点:
劣势是,因为线程类已经继承了 Thread 类,所以不能再继承其他父类。
优势是,编程简单,如果需要访问当前线程,则无需使用 Thread.currentThread() 方法,直接使用 this 即可获取当前线程
鉴于上面分析,因此一般推荐采用实现Runnable接口、Callable接口的方式来创建多线程。
# 1.2 分析线程信息
可以在运行的线程中创建线程,如果想查看这些线程的状态与信息,则可采用3种常见命令,他们分别是 jps+jstack.exe、jmc.exe 和 jvisualvm.exe,它们在 jdk\bin 文件夹中。
public class ToolThread {
    public static void main(String[] args) {
        for (int i = 0; i < 5; i++) {
            new Thread(() -> {
                try {
                    Thread.sleep(500_000);
                } catch (InterruptedException e) {
                    e.printStackTrace();
                }
            }).start();
        }
    }
}
2
3
4
5
6
7
8
9
10
11
12
13
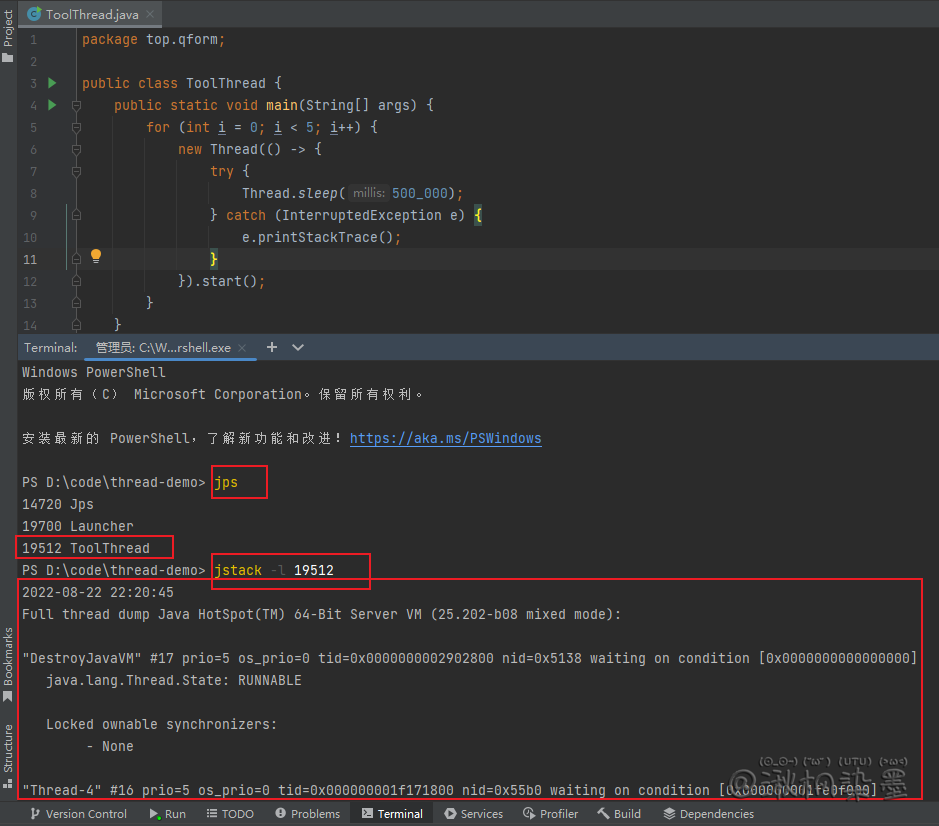
jps+jstack.exe命令
用idea运行上面程序(必须管理员模式),或者单独运行,使用cmd命令查看Java进程,之后使用jstack查看该进程下线程的状态。
jmc.exe命令
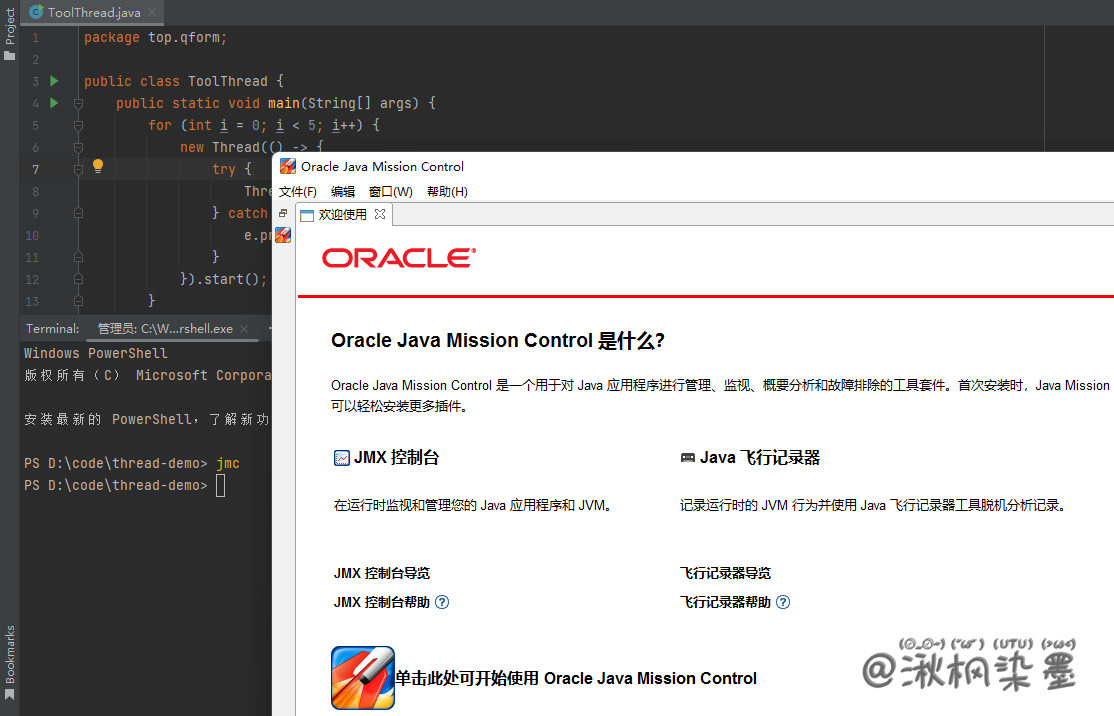
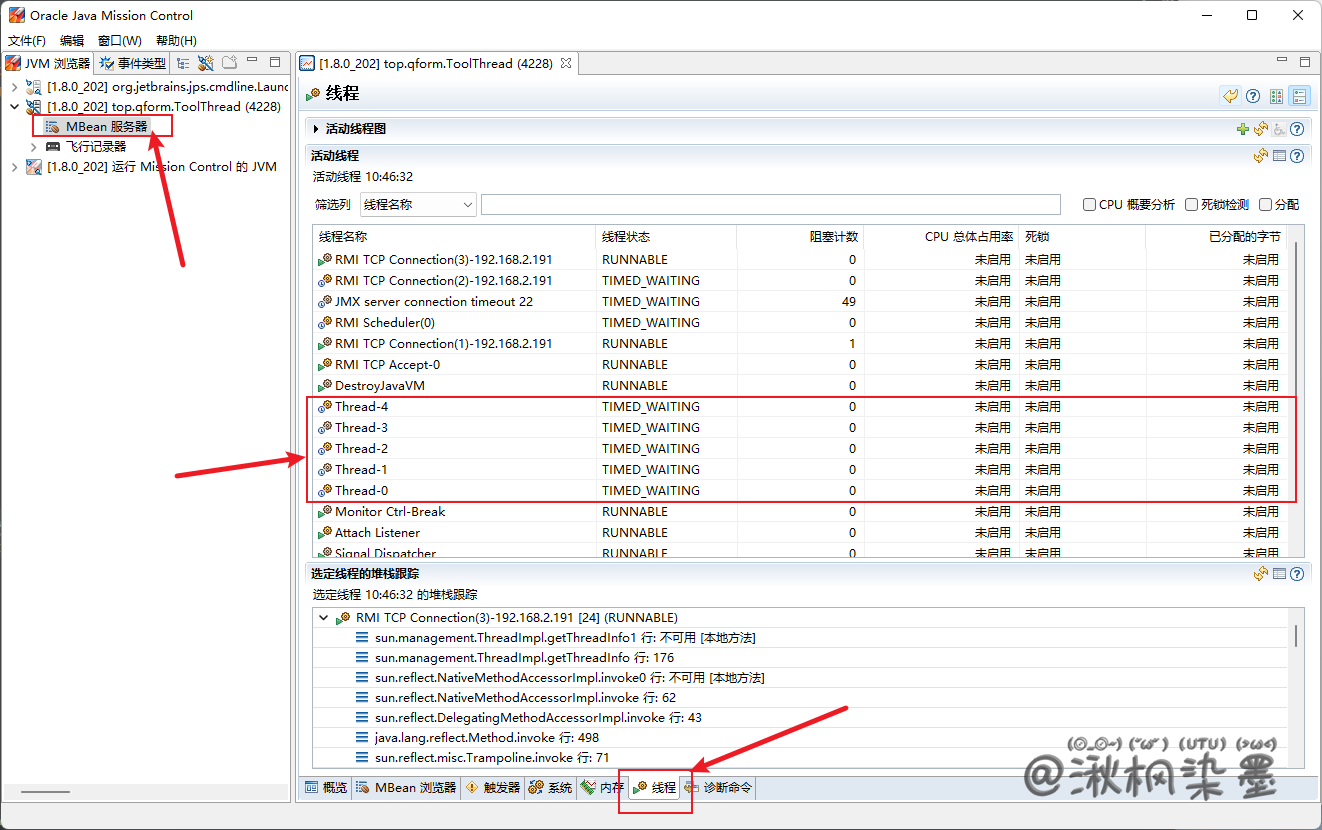
直接通过输入jmc打开,或者手动双击 jmc.exe 打开。关闭欢迎界面,再双击 "MBean服务器",然后单击 "线程" 选项卡
jvisualvm.exe命令
直接通过输入jvisualvm打开,或者手动双击jvisualvm.exe 打开。双击对应进程,再单击 "线程" 选项卡。
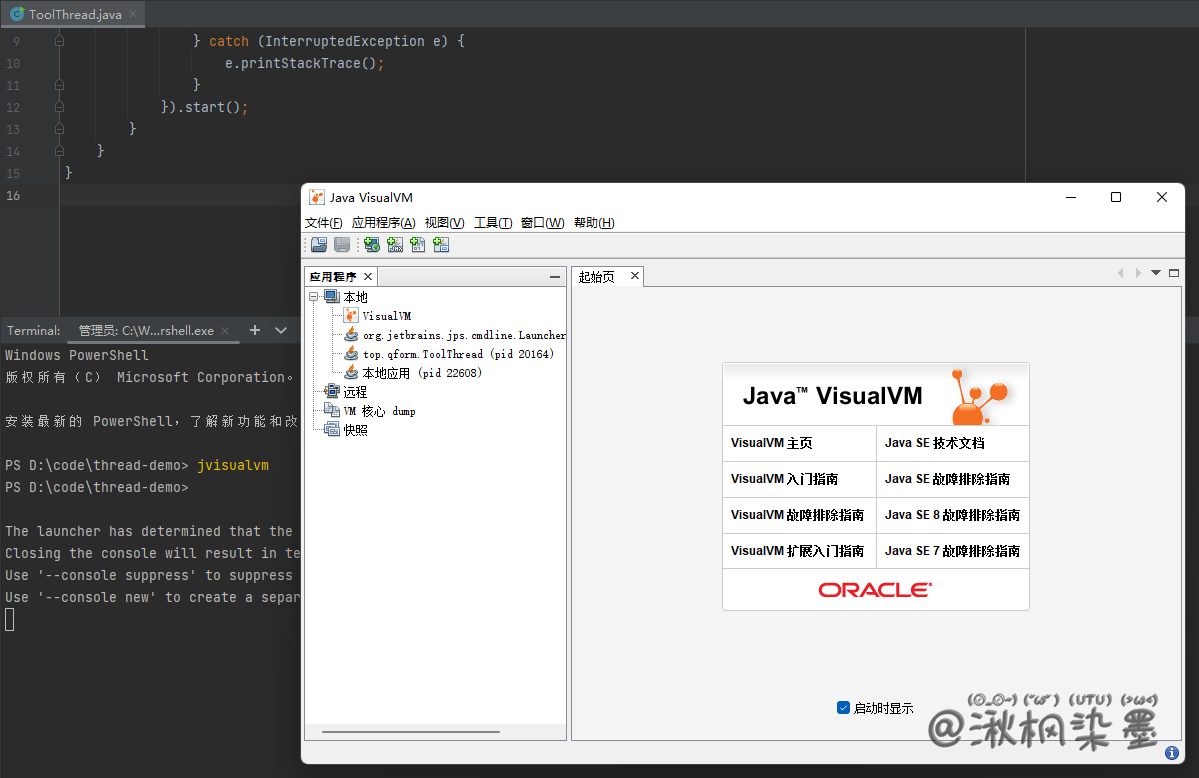
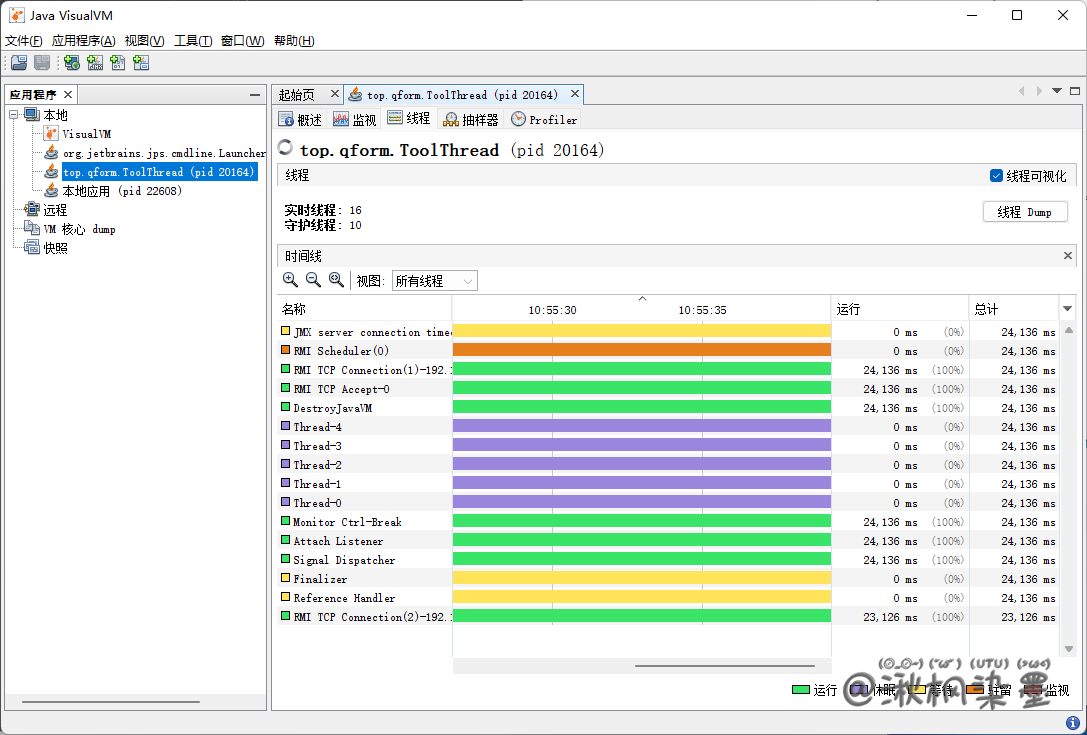
但采用 jvisualvm.exe 命令看不到线程运行的状态,所以推荐使用 jmc.exe 命令来分析线程对象的相关信息。
# 1.3 Thread部分API
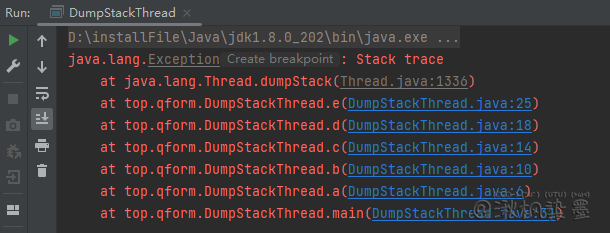
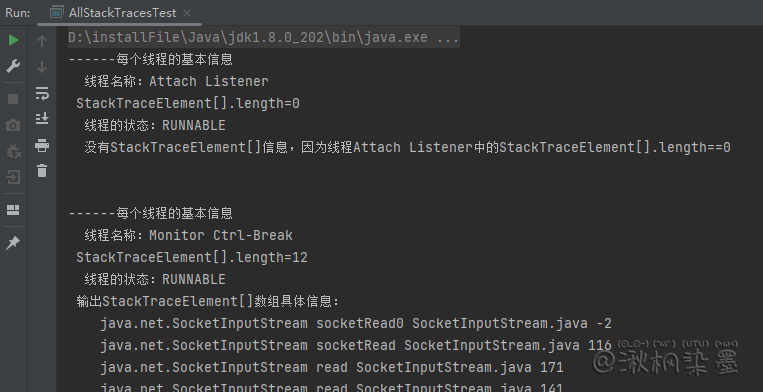
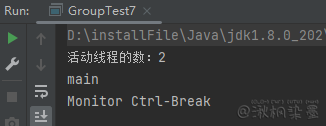
public static native Thread currentThread():可返回代码段正在被哪个线程调用。public final native boolean isAlive():判断当前线程是否存活(处于运行或准备开始运行的状态)。public static native void sleep(long millis) throws InterruptedException:在指定的时间(毫秒内)让当前 "正在执行的线程" 休眠,这个 "正在执行的线程" 是指this.currentThread()返回的线程。public static void sleep(long millis, int nanos) throws InterruptedException:在指定的毫秒数加指定的纳秒数内让当前正在执行的线程休眠。public StackTraceElement[] getStackTrace():返回一个表示该线程堆栈跟踪元素数组。如果该线程尚未启动或已经终止,则该方法将返回一个零长度数组。如果返回的数组不是零长度的,则其第一个元素代表堆栈顶,它是该数组中最新的方法调用。最后一个元素代表堆栈底,是该数组中最旧的方法调用。public static void dumpStack():将当前线程的堆栈跟踪信息输出至标准错误流。该方法仅用于调试。public static Map<Thread, StackTraceElement[]> getAllStackTraces():返回所有活动线程的堆栈跟踪的一个映射。映射键是线程,而每个映射值都是一个StackTraceElement数组,该数组表示相应Thread的堆栈转储。返回的堆栈跟踪的格式都是针对getStackTrace方法指定的。在调用该方法的同时,线程可能也在执行。每个线程的堆栈跟踪仅代表一个快照,并且每个堆栈跟踪都可以在不同时间获得。如果虚拟机没有线程的堆栈跟踪信息,则映射值中将返回一个零长度数组。public long getId():取得线程的唯一标识。public static native void yield():放弃当前的CPU资源,让其他任务去占用CPU执行时间,放弃的时间不确定,有可能刚刚放弃,马上又获得CPU时间片。public static native boolean holdsLock(Object obj):当currentThread在指定的对象上保持锁定时,才返回true。public static int activeCount():返回当前线程的线程组中活动线程的数目。public static int enumerate(Thread tarray[]):将当前线程的线程组及其子组中的每一个活动线程复制到指定的数组中。该方法只调用当前线程的线程组的enumerate()方法,且带有数组参数。
测试代码
关键字this代表this所在类的对象
public class IsAliveThread extends Thread {

    public IsAliveThread() {
        System.out.println("Thread--" + Thread.currentThread().getName() + ":" + Thread.currentThread().isAlive()); // Thread--main:true
        System.out.println("this--" + this.getName() + ":" + this.isAlive());   // this--Thread-0:false
    }

    @Override
    public void run() {
        System.out.println("Thread--" + Thread.currentThread().getName() + ":" + Thread.currentThread().isAlive()); // Thread--Thread-1:true
        System.out.println("this--" + this.getName() + ":" + this.isAlive());   // this--Thread-0:false
    }

    public static void main(String[] args) {
        Thread thread = new Thread(new IsAliveThread());
        System.out.println("===========================================");
        thread.start();
    }
}
2
3
4
5
6
7
8
9
10
11
12
13
14
15
16
17
18
19
当前线程的堆栈跟踪信息
public class StackTraceTest {
    public void a() {
        b();
    }

    public void b() {
        c();
    }

    public void c() {
        d();
    }

    public void d() {
        e();
    }

    public void e() {
        StackTraceElement[] array = Thread.currentThread().getStackTrace();
        for (StackTraceElement eachElement : array) {
            System.out.println("className=" + eachElement.getClassName() + " methodName=" + eachElement.getMethodName() + " fileName=" + eachElement.getFileName() + " lineNumber=" + eachElement.getLineNumber());
        }

    }

    public static void main(String[] args) {
        StackTraceTest test = new StackTraceTest();
        test.a();
    }
}
2
3
4
5
6
7
8
9
10
11
12
13
14
15
16
17
18
19
20
21
22
23
24
25
26
27
28
29
30
31

public class DumpStackThread {

    public void a() {
        b();
    }

    public void b() {
        c();
    }

    public void c() {
        d();
    }

    public void d() {
        e();
    }

    public void e() {
        int age = 0;
        age = 100;
        if (age == 100) {
            Thread.dumpStack();
        }
    }

    public static void main(String[] args) {
        DumpStackThread test = new DumpStackThread();
        test.a();
    }

}
2
3
4
5
6
7
8
9
10
11
12
13
14
15
16
17
18
19
20
21
22
23
24
25
26
27
28
29
30
31
32
public class AllStackTracesTest {

    public void a() {
        b();
    }

    public void b() {
        c();
    }

    public void c() {
        d();
    }

    public void d() {
        e();
    }

    public void e() {
        Map<Thread, StackTraceElement[]> map = Thread.currentThread().getAllStackTraces();
        if (map.size() != 0) {
            for (Thread eachThread : map.keySet()) {
                StackTraceElement[] array = map.get(eachThread);
                System.out.println("------每个线程的基本信息");
                System.out.println("  线程名称:" + eachThread.getName());
                System.out.println(" StackTraceElement[].length=" + array.length);
                System.out.println("  线程的状态:" + eachThread.getState());
                if (array.length != 0) {
                    System.out.println(" 输出StackTraceElement[]数组具体信息:");
                    for (StackTraceElement eachElement : array) {
                        System.out.println("    " + eachElement.getClassName() + " " + eachElement.getMethodName() + " " + eachElement.getFileName() + " " + eachElement.getLineNumber());
                    }
                } else {
                    System.out.println("  没有StackTraceElement[]信息,因为线程" + eachThread.getName() + "中的StackTraceElement[].length==0");
                }
                System.out.println();
                System.out.println();
            }
        }
    }

    public static void main(String[] args) {
        AllStackTracesTest test = new AllStackTracesTest();
        test.a();
    }

}
2
3
4
5
6
7
8
9
10
11
12
13
14
15
16
17
18
19
20
21
22
23
24
25
26
27
28
29
30
31
32
33
34
35
36
37
38
39
40
41
42
43
44
45
46
47
public class IdTest {

    public static void main(String[] args) {
        Thread runThread = Thread.currentThread();
        System.out.println(runThread.getName() + " " + runThread.getId());
    }

}
2
3
4
5
6
7
8
main线程id为1
public class YieIdTest extends Thread {

    @Override
    public void run() {
        long beginTime = System.currentTimeMillis();
        int count = 0;
        for (int i = 0; i < 50000000; i++) {
            // Thread.yield();
            count = count + (i + 1);
        }
        long endTime = System.currentTimeMillis();
        System.out.println("用时:" + (endTime - beginTime) + "毫秒");
    }

    public static void main(String[] args) {
        new YieIdTest().start();
    }
}
2
3
4
5
6
7
8
9
10
11
12
13
14
15
16
17
18
把 // Thread.yield() 的注释去掉,时间为
public class HoldsLockThread {

    public static void main(String[] args) {
        System.out.println("A " + Thread.holdsLock(HoldsLockThread.class));     // A false
        synchronized (HoldsLockThread.class) {
            System.out.println("B " + Thread.holdsLock(HoldsLockThread.class)); // B true
        }
        System.out.println("C " + Thread.holdsLock(HoldsLockThread.class));     // C false
    }

}
2
3
4
5
6
7
8
9
10
11
public class GroupTest7 {

    public static void main(String[] args) {
        // 当前线程的线程组中活动线程的数目
        System.out.println("活动线程的数:" + Thread.activeCount());

        Thread[] threadArray = new Thread[Thread.activeCount()];
        Thread.enumerate(threadArray);
        for (Thread thread : threadArray) {
            System.out.println(thread.getName());
        }
    }
}
2
3
4
5
6
7
8
9
10
11
12
13
# 1.4 停止线程
停止一个线程可以使用 Thread.stop() 方法,但不推荐使用此方法,虽然它确实可以停止一个正在运行的线程,但是这个方法是不安全的,而且是被弃用作废的,意味着在将来的Java版本中,这个方法将不可用或不被支持。
大多数情况下,停止一个线程使用 Thread.interrupt() 方法,但这个方法不会终止一个正在运行的线程,还需要加入一个判断才可以完成线程的停止。
public class InterruptThread extends Thread {

    @Override
    public void run() {
        System.out.println("Thread start");
        int sum = 0;
        for (int i = 0; i < 500_000; i++) {
            sum = sum + i;
        }
        System.out.println("Thread end");
    }

    public static void main(String[] args) {
        Thread thread = new InterruptThread();
        thread.start();
        thread.interrupt();
        System.out.println("interrupt");
    }
}
2
3
4
5
6
7
8
9
10
11
12
13
14
15
16
17
18
19
可以看到上面执行完 interrupt方法并没有停止
在Java中有3种方法可以使正在运行的线程终止运行:
- 使用退出标志使线程正常退出。
- 使用
stop()方法强行终止线程,但是这个方法不推荐使用,因为stop()和suspend()、resume()一样,都是作废过期的方法,使用它们可能发生不可预料的结果。 - 使用
interrupt()方法中断线程。
判断线程是否为停止状态
public static boolean interrupted():测试 currentThread() 是否已经中断。执行后具有清除状态标志值为false的功能。public boolean isInterrupted():测试 this 关键字所在类的对象是否已经中断。不清除状态标志。
测试代码
public class InterruptedThread extends Thread {

    @Override
    public void run() {
        int sum = 0;
        for (int i = 0; i < 500_000; i++) {
            sum = sum + i;
        }
    }

    public static void main(String[] args) {
        Thread thread = new InterruptedThread();
        thread.start();
        thread.interrupt();
        System.out.println("是否停止1?=" + thread.isInterrupted());
        System.out.println("是否停止2?=" + thread.isInterrupted());
        System.out.println("====================================");
        Thread.currentThread().interrupt();
        System.out.println("是否停止3?=" + Thread.interrupted());
        System.out.println("是否停止4?=" + Thread.interrupted());
    }

}
2
3
4
5
6
7
8
9
10
11
12
13
14
15
16
17
18
19
20
21
22
23
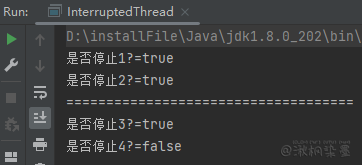
通过标志位配合抛出异常来达到停止线程的目的
public class Interrupt2Thread extends Thread {

    @Override
    public void run() {
        try {
            while (true) {
                if (interrupted()) {
                    System.out.println("停止线程退出");
                    throw new InterruptedException();
                }
            }
        } catch (InterruptedException e) {
            System.out.println("执行catch");
        }
    }

    public static void main(String[] args) {
        Thread thread = new Interrupt2Thread();
        thread.start();
        thread.interrupt();
    }

}
2
3
4
5
6
7
8
9
10
11
12
13
14
15
16
17
18
19
20
21
22
23
sleep状态下停止线程异常
public class SleepThread extends Thread {

    @Override
    public void run() {
        System.out.println("start");
        try {
            Thread.sleep(20_000);
        } catch (InterruptedException e) {
            System.out.println("被中断,标记状态=" + this.isInterrupted());
            e.printStackTrace();
        }
        System.out.println("end");
    }

    public static void main(String[] args) throws InterruptedException {
        Thread thread = new SleepThread();
        thread.start();
        Thread.sleep(1_000);
        thread.interrupt();
    }
}
2
3
4
5
6
7
8
9
10
11
12
13
14
15
16
17
18
19
20
21

从运行结果来看,如果线程在sleep状态下停止,则该线程会进入catch语句,并且清除停止状态值,变为false
不管sleep和interrupt调用顺序,只要interrupt和sleep碰到一起就会出现异常
stop()方法暴力停止线程,此方法作废,如果暴力性地强制让线程停止,则一些清理性的工作可能得不到完成,或者数据添加不完整。调用该方法时,会抛出 java.lang.ThreadDeath 异常。
上面演示了通过标志位配合抛出异常来达到停止线程的目的,同时也可以用
return;方法来代替异常,不过建议使用抛出异常方式。
# 1.5 线程优先级
在操作系统中,线程可以划分优先级,优先级较高的线程得到CPU资源较多,也就是CPU优先执行优先级较高的线程对象中的任务,其实就是让高优先级的线程获得更多的CPU时间片。设置线程优先级有助于 "线程规划器" 确定在下一次选择哪一个线程来优先执行。设置线程的优先级使用 setPriority() 方法
在Java中,线程的优先级分为1~10共10个等级,如果优先级小于1或大于10,则JDK抛出异常throw new IllegalArgumentException()
JDK使用3个常量来预置定义优先级的值,代码如下(Thread类):
public final static int MIN_PRIORITY = 1public final static int NORM_PRIORITY = 5public final static int MAX_PRIORITY = 10
public class PriorityThread extends Thread {

    @Override
    public void run() {
        System.out.println("Thread run priority=" + this.getPriority());    // Thread run priority=6
    }

    public static void main(String[] args) {
        System.out.println("main thread begin priority=" + Thread.currentThread().getPriority());   // main thread begin priority=5
        Thread.currentThread().setPriority(6);
        System.out.println("main thread end priority=" + Thread.currentThread().getPriority()); // main thread end priority=6
        // 初始化会根据父线程的优先级赋值
        new PriorityThread().start();
    }

}
2
3
4
5
6
7
8
9
10
11
12
13
14
15
16
如果把 new PriorityThread().start() 放在 Thread.currentThread().setPriority(6) 之前,就发现子线程的优先级还是5,子线程初始化的时候才会根据父线程的优先级赋值,后面父线程更改,子线程不会跟着变动。
CPU会尽量将执行资源让给优先级比较高的线程。但不是必然效果,具有不确定性和随机性。
# 1.6 守护线程
Java中有两种线程:一种是用户线程,也称非守护线程;另一种是守护线程。
守护线程是一种特殊的线程,当进程中不存在非守护线程了,则守护线程自动销毁。典型的守护线程是垃圾回收线程,当进程中没有非守护线程了,则垃圾回收线程也就没有存在的必要了,自动销毁。
主线程main属于用户线程,凡是调用 setDaemon(true) 代码并且传入true值的线程才是守护线程。
public class DaemonThread {

    public static void main(String[] args) throws InterruptedException {
        Thread thread = new Thread(() -> {
            while (true) {
                System.out.println("Thread Running ...");
                try {
                    Thread.sleep(1000);
                } catch (InterruptedException e) {
                    e.printStackTrace();
                }
            }
        });
        thread.setDaemon(true);
        thread.start();
        Thread.sleep(3000);
        System.out.println("Main线程结束,子线程设为守护线程也停止");
    }

}
2
3
4
5
6
7
8
9
10
11
12
13
14
15
16
17
18
19
20
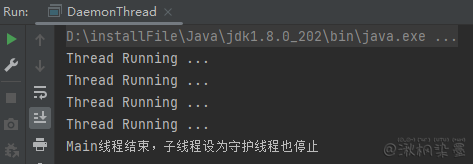
setDaemon() 必须在执行 start() 之前执行方法,不然会出现如下异常
# 二:对象及变量的并发访问
非线程安全问题会在多个线程对同一个对象中的实例变量进行并发访问时发生,产生的后果就是 "脏读",也就是读取到的数据其实是被更改过的。而线程安全是指获得实例变量的值是经过同步处理的,不会出现脏读的现象。
非线程安全问题存在于实例变量中,对于方法内部的私有变量,则不存在非线程安全问题,结果是 "线程安全" 的。
父类方法使用synchronized,如果子类重写父类的方法,也需要额外加入synchronized才可,不然则为异步方法。
# 2.1 同步synchronized在字节码指令中的原理
在方法中使用synchronized关键字实现同步的原因是使用了flag标记
ACC_SYNCHRONIZED,当调用方法时,调用指令会检查方法的ACC_SYNCHRONIZED访问标志是否设置,如果设置了,执行线程先持有同步锁,然后执行方法,最后在方法完成时释放锁。
public class Test {

    synchronized public static void testMethod() {
    }

    public static void main(String[] args) throws InterruptedException {
        testMethod();
    }

}
2
3
4
5
6
7
8
9
10
在cmd中使用javap命令将class文件转成字节码指令,参数-v用于输出附加信息,参数-c用于对代码进行反汇编。命令:javap -c -v Test.class
如果使用IDEA查看,可以看参考 IDEA - 添加javap
生成这个class文件对应的字节码指令,指令的核心代码如下:
public static synchronized void testMethod();
	descriptor: ()V
    flags: ACC_PUBLIC, ACC_STATIC, ACC_SYNCHRONIZED
    Code:
		stack=0, locals=0, args_size=0
		0: return
	LineNumberTable:
		line 6: 0
2
3
4
5
6
7
8
在反编译的字节码指令中,对testMethod()方法使用了flag标记ACC_SYNCHRONIZED,说明此方法是同步的。
如果使用synchronized代码块,则使用 monitorenter 和 monitorexit 指令进行同步处理。
public class Test2 {

    public void myMethod() {
        synchronized (this) {
            int age = 100;
        }
    }

    public static void main(String[] args) throws InterruptedException {
        Test2 test = new Test2();
        test.myMethod();
    }

}
2
3
4
5
6
7
8
9
10
11
12
13
14
生成这个class文件对应的字节码指令,指令核心代码如下:
public void myMethod();
	descriptor: ()V
    flags: ACC_PUBLIC
    Code:
      stack=2, locals=4, args_size=1
         0: aload_0
         1: dup
         2: astore_1
         3: monitorenter
         4: bipush        100
         6: istore_2
         7: aload_1
         8: monitorexit
         9: goto          17
        12: astore_3
        13: aload_1
        14: monitorexit
        15: aload_3
        16: athrow
        17: return
2
3
4
5
6
7
8
9
10
11
12
13
14
15
16
17
18
19
20
上面结果说明了,字节码中使用 monitorenter 和 monitorexit 指令进行同步处理。
# 2.2 锁
对象锁
public class ObjectLock {

    synchronized public void methodA() {
        try {
            System.out.println("begin methodA threadName=" + Thread.currentThread().getName());
            Thread.sleep(1000);
            System.out.println("end methodA");
        } catch (InterruptedException e) {
            e.printStackTrace();
        }
    }

    public void methodB() {
        try {
            System.out.println("begin methodB threadName=" + Thread.currentThread().getName());
            Thread.sleep(1000);
            System.out.println("end methodB");
        } catch (InterruptedException e) {
            e.printStackTrace();
        }
    }

    public static void main(String[] args) {
        ObjectLock object = new ObjectLock();
        new Thread(() -> object.methodA(), "AA").start();
        new Thread(() -> object.methodB(), "BB").start();
    }

}
2
3
4
5
6
7
8
9
10
11
12
13
14
15
16
17
18
19
20
21
22
23
24
25
26
27
28
29
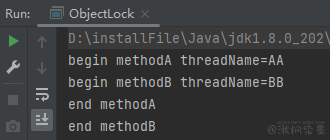
通过上面可以得知,虽然线程AA先持有了ObjectLock对象锁,但线程BB完全可以异步调用非synchronized类型的方法。
将上面的 public void methodB() 改成 synchronized public void methodB()
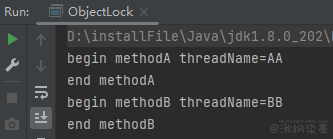
结论如下:
1)AA线程先持有ObjectLock对象的Lock锁,BB线程可以以异步的方式调用ObjectLock对象中的非synchronized类型的方法。
2)AA线程先持有ObjectLock对象的Lock锁,BB线程如果在这时调用object对象中的synchronized类型的方法,则需要等待,也就是同步。
3)在方法声明处添加synchronized并不是锁方法,而是锁当前类的对象。
4)在Java中只有 "将对象作为锁" 这种说法,并没有 "锁方法" 这种说法。
5)在Java语言中,"锁"就是"对象","对象"可以映射成"锁",哪个线程拿到这把锁,哪个线程就可以执行这个对象中的synchronized同步方法。
6)如果在X对象中使用了synchronized关键字声明非静态方法,则X对象就被当成锁。
7)如果ObjectLock多个,分别给线程AA和BB,则会产生多个对象锁。从而结果为异步。
- 关键字synchronized拥有重入锁的功能,即在使用synchronized时,当一个线程得到一个对象锁后,再次请求此对象锁时是可以得到该对象锁的,这也证明在一个synchronized方法/块的内部调用本类的其他synchronized方法/块时,是永远可以得到锁的;
- 锁重入也支持父子类继承的环境;
- 当一个线程执行的代码出现异常时,其所持有的锁会自动释放;
- 类Thread.java中的
suspend()方法和sleep(millis)方法被调用后并不释放锁。 - 只要对象不变,仅仅对象的属性改变了,但对象未发生改变,运行的结果即为同步,
代码块亦是同理:
public class ObjectLock2 {

    public void serviceMethodA() {
        try {
            synchronized (this) {
                System.out.println("A begin time=" + System.currentTimeMillis());
                Thread.sleep(2000);
                System.out.println("A end    end=" + System.currentTimeMillis());
            }
        } catch (InterruptedException e) {
            e.printStackTrace();
        }
    }

    public void serviceMethodB() {
        synchronized (this) {
            System.out.println("B begin time=" + System.currentTimeMillis());
            System.out.println("B end    end=" + System.currentTimeMillis());
        }
    }

    public static void main(String[] args) {
        ObjectLock2 object = new ObjectLock2();
        new Thread(() -> object.serviceMethodA(), "A").start();
        new Thread(() -> object.serviceMethodB(), "B").start();
    }

}
2
3
4
5
6
7
8
9
10
11
12
13
14
15
16
17
18
19
20
21
22
23
24
25
26
27
28
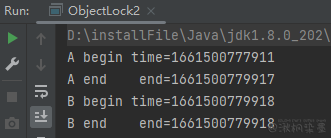
Java支持将 "任意对象" 作为锁来实现同步的功能,这个 "任意对象" 大多数是实例变量及方法的参数。使用格式为synchronized(非this对象)。锁非this对象具有一定的优点:如果一个类中有很多个synchronized方法,则这时虽然能实现同步,但影响运行效率,如果使用同步代码块锁非this对象,则synchronized(非this)代码块中的程序与同步方法是异步的,因为有多把锁,不与其他锁this同步方法争抢this锁,可大大提高运行效率。
类锁
类Class的单例性,每一个*.java文件对应Class类的实例都是一个,在内存中是单例的。在静态static方法上使用synchronized关键字声明同步方法时,使用当前静态方法所在类对应Class类的单例对象作为锁。
public class StaticThread {

    synchronized public static void printA() {
        try {
            System.out.println("线程名称为:" + Thread.currentThread().getName() + "在" + System.currentTimeMillis() + "进入printA");
            Thread.sleep(3000);
            System.out.println("线程名称为:" + Thread.currentThread().getName() + "在" + System.currentTimeMillis() + "离开printA");
        } catch (InterruptedException e) {
            e.printStackTrace();
        }
    }

    synchronized public static void printB() {
        System.out.println("线程名称为:" + Thread.currentThread().getName() + "在" + System.currentTimeMillis() + "进入printB");
        System.out.println("线程名称为:" + Thread.currentThread().getName() + "在" + System.currentTimeMillis() + "离开printB");
    }

    synchronized public void printC() {
        System.out.println("线程名称为:" + Thread.currentThread().getName() + "在" + System.currentTimeMillis() + "进入printC");
        System.out.println("线程名称为:" + Thread.currentThread().getName() + "在" + System.currentTimeMillis() + "离开printC");
    }

    public static void main(String[] args) {
        StaticThread st = new StaticThread();
        new Thread(() -> st.printA(), "A").start();
        new Thread(() -> st.printB(), "B").start();
        new Thread(() -> st.printC(), "C").start();
    }

}
2
3
4
5
6
7
8
9
10
11
12
13
14
15
16
17
18
19
20
21
22
23
24
25
26
27
28
29
30
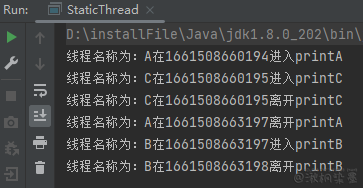
异步运行的原因是持有不同的锁,一个是将类StaticThread的对象作为锁,另一个是将StaticThread类对应Class类的对象作为锁,A、B线程和C线程是异步的关系,而A线程和B线程是同步的关系。
代码块亦是同理:
public class StaticThread2 {

    public void printA() {
        synchronized (StaticThread2.class) {
            try {
                System.out.println("线程名称为:" + Thread.currentThread().getName() + "在" + System.currentTimeMillis() + "进入printA");
                Thread.sleep(3000);
                System.out.println("线程名称为:" + Thread.currentThread().getName() + "在" + System.currentTimeMillis() + "离开printA");
            } catch (InterruptedException e) {
                e.printStackTrace();
            }
        }

    }

    public void printB() {
        synchronized (StaticThread2.class) {
            System.out.println("线程名称为:" + Thread.currentThread().getName() + "在" + System.currentTimeMillis() + "进入printB");
            System.out.println("线程名称为:" + Thread.currentThread().getName() + "在" + System.currentTimeMillis() + "离开printB");
        }
    }

    public static void main(String[] args) {
        StaticThread2 st1 = new StaticThread2();
        StaticThread2 st2 = new StaticThread2();
        new Thread(() -> st1.printA(), "A").start();
        new Thread(() -> st2.printB(), "B").start();
    }

}
2
3
4
5
6
7
8
9
10
11
12
13
14
15
16
17
18
19
20
21
22
23
24
25
26
27
28
29
30
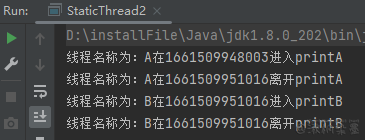
JVM具有String常量池的功能,大多数情况下,同步synchronized代码块不使用String作为锁对象,而改用其他,例如,new Object()实例化一个新的Object对象,它并不放入缓存池中,或者执行new String()创建不同的字符串对象,形成不同的锁
# 2.3 死锁
Java线程死锁是一个经典的多线程问题,因为不同的线程都在等待根本不可能被释放的锁,从而导致所有的任务都无法继续完成。在多线程技术中,"死锁" 是必须避免的,因为这会造成线程 "假死"。
public class DealThread implements Runnable {

    public String username;
    public Object lock1 = new Object();
    public Object lock2 = new Object();

    public void setFlag(String username) {
        this.username = username;
    }

    @Override
    public void run() {
        if (username.equals("a")) {
            synchronized (lock1) {
                try {
                    System.out.println("username = " + username);
                    Thread.sleep(3000);
                } catch (InterruptedException e) {
                    e.printStackTrace();
                }
                synchronized (lock2) {
                    System.out.println("按lock1->lock2代码顺序执行了");
                }
            }
        }
        if (username.equals("b")) {
            synchronized (lock2) {
                try {
                    System.out.println("username = " + username);
                    Thread.sleep(3000);
                } catch (InterruptedException e) {
                    e.printStackTrace();
                }
                synchronized (lock1) {
                    System.out.println("按lock2->lock1代码顺序执行了");
                }
            }
        }
    }

    public static void main(String[] args) {
        try {
            DealThread t1 = new DealThread();
            t1.setFlag("a");

            Thread thread1 = new Thread(t1);
            thread1.start();

            Thread.sleep(100);

            t1.setFlag("b");
            Thread thread2 = new Thread(t1);
            thread2.start();
        } catch (InterruptedException e) {
            e.printStackTrace();
        }
    }

}
2
3
4
5
6
7
8
9
10
11
12
13
14
15
16
17
18
19
20
21
22
23
24
25
26
27
28
29
30
31
32
33
34
35
36
37
38
39
40
41
42
43
44
45
46
47
48
49
50
51
52
53
54
55
56
57
58
59
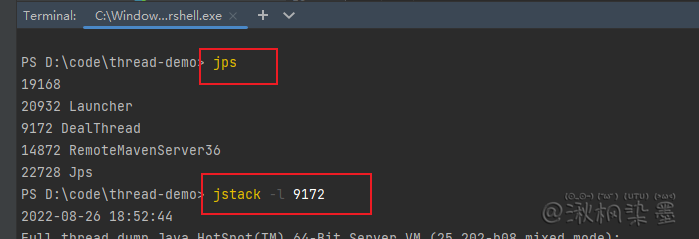
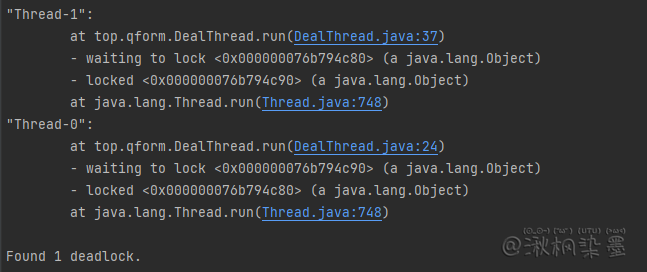
可以使用JDK自带的工具来监测是否有死锁的现象,可以使用 "jps+jstack",
# 2.4 补充
println()方法为同步方法
PrintStream源码
public class PrintStream extends FilterOutputStream implements Appendable, Closeable {

	// ... ...

    public void println(String x) {
        synchronized (this) {
            print(x);
            newLine();
        }
    }

    public void println(Object x) {
        String s = String.valueOf(x);
        synchronized (this) {
            print(s);
            newLine();
        }
    }

    // ... ...
}
2
3
4
5
6
7
8
9
10
11
12
13
14
15
16
17
18
19
20
21
# 三:volatile
volatile在使用上具有以下特性:
- 可见性:B线程能马上看到A线程更改的数据。
- 原子性:在32位系统中,针对未使用volatile声明的long或double数据类型没有实现写原子性,如果想实现,则声明变量时添加volatile,而在64位系统中,原子性取决于具体的实现,在X86架构64位JDK版本中,写double或long是原子的。另外,针对用volatile声明的int i变量进行i++操作时是非原子的。这些知识点都在后面的章节有代码进行验证。
- 禁止代码重排序。
# 3.1 可见性
public class RunThread extends Thread {

    private boolean isRunning = true;

    public void setRunning(boolean isRunning) {
        this.isRunning = isRunning;
    }

    @Override
    public void run() {
        System.out.println("进入run了");
        while (isRunning == true) {
        }
        System.out.println("线程被停止了!");
    }

    public static void main(String[] args) {
        try {
            RunThread thread = new RunThread();
            thread.start();
            Thread.sleep(1000);
            thread.setRunning(false);
            System.out.println("已经赋值为false");
        } catch (InterruptedException e) {
            e.printStackTrace();
        }
    }

}
2
3
4
5
6
7
8
9
10
11
12
13
14
15
16
17
18
19
20
21
22
23
24
25
26
27
28
29
代码 System.out.println("线程被停止了!") 永远不会被执行。是什么原因造成出现死循环呢?
在启动RunThread.java线程时,变量
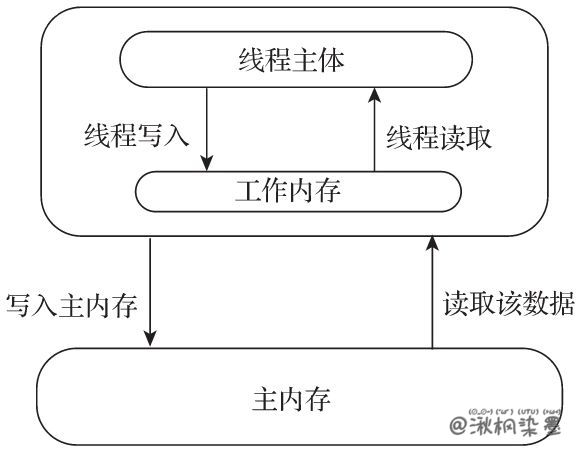
private boolean isRunning=true存在于公共堆栈及线程的私有堆栈中,线程运行后一直在线程的私有堆栈中取得的isRunning的值是true,而代码 "thread.setRunning(false)" 虽然被执行,更新的却是公共堆栈中的isRunning变量,改为了false,操作的是两块内存地址中的数据,所以线程一直处于死循环的状态,内存结构如下。这个问题其实是私有堆栈中的值和公共堆栈中的值不同步造成的,解决这样的问题就要使用volatile关键字了,其主要的作用是当线程访问isRunning这个变量时,强制从公共堆栈中进行取值。
将上面的 private boolean isRunning = true 更改为 volatile private boolean isRunning = true
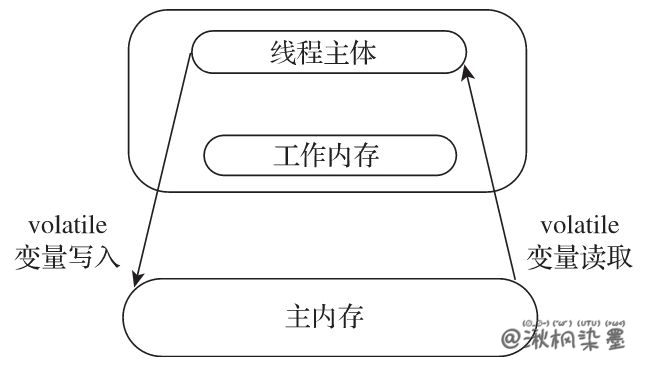
通过使用volatile关键字,可以强制从公共内存中读取变量的值,内存结构如下:
关键字synchronized可以使多个线程访问同一个资源具有同步性,而且具有使线程工作内存中的私有变量与公共内存中的变量同步的特性,即可见性。
public class Service {
    private boolean isContinueRun = true;

    public void runMethod() {
        String anyString = new String();
        while (isContinueRun == true) {
            synchronized (anyString) {
            }
        }
        System.out.println("停下来了!");
    }

    public void stopMethod() {
        isContinueRun = false;
    }

    public static void main(String[] args) throws InterruptedException {
        Service service = new Service();
        new Thread(() -> service.runMethod()).start();
        Thread.sleep(1000);
        new Thread(() -> service.stopMethod()).start();
        System.out.println("已经发起停止的命令了!");
    }
}
2
3
4
5
6
7
8
9
10
11
12
13
14
15
16
17
18
19
20
21
22
23
24
上面例子synchronized放在外部则无效,例如
synchronized (anyString) {
	while (isContinueRun == true) {
    }
}
2
3
4
只有获取锁时生效
# 3.2 原子性
在32位系统中,针对未使用volatile声明的long或double数据类型没有实现写原子性,如果想实现,则声明变量时添加volatile。在64位系统中,原子性取决于具体的实现,在X86架构64位JDK版本中,写double或long是原子的。
另外,volatile关键字最致命的缺点是不支持多步原子性,也就是多个线程对用volatile修饰的变量i执行i--操作时,i--操作还会被分解成3步,造成非线程安全问题的出现。
public class MyThread extends Thread {

    volatile public static int count;

    private static void addCount() {
        for (int i = 0; i < 100; i++) {
            count++;
        }
        System.out.println("count=" + count);
    }

    @Override
    public void run() {
        addCount();
    }

    public static void main(String[] args) {
        for (int i = 0; i < 100; i++) {
            new MyThread().start();
        }
    }
}
2
3
4
5
6
7
8
9
10
11
12
13
14
15
16
17
18
19
20
21
22
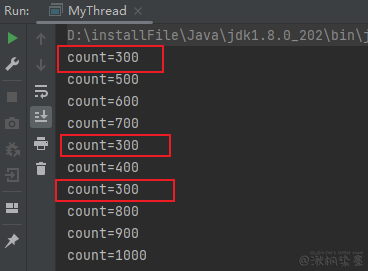
说明在多线程环境下,volatile public static int count++ 操作是非原子的。
解决方法一:使用synchronized
public class MyThread extends Thread {
	// 没有必要再使用volatile关键字来声明count变量了
    public static int count;
    //注意一定要添加static关键字
    //这样synchronized与static锁的内容就是MyThread.class类了也就达到同步的效果
    synchronized private static void addCount() {
        // ... ...
    }
	// ... ...
}
2
3
4
5
6
7
8
9
10
关键字volatile使用的主要场合是在多个线程中可以感知实例变量被更改了,并且可以获得最新的值时,也就是可用于增加可见性/可视性。
关键字volatile提示线程每次从共享内存中去读取变量,而不是从私有内存中去读取,这样就保证了同步数据的可见性。但这里需要注意的是,如果修改实例变量中的数据,如i++,即i=i+1,则这样的操作其实并不是一个原子操作,也就是非线程安全的。表达式i++的操作步骤分解如下:
从内存中取出i的值;
计算i的值;
将i的值写到内存中。
假如在第2步计算i的值时,另外一个线程也修改i的值,那么这个时候就会出现脏数据,
解决方法二:使用Atomic原子类
除了在i++操作时使用synchronized关键字实现同步外,还可以使用AtomicInteger原子类实现原子性。
原子操作是不能分割的整体,没有其他线程能够中断或检查处于原子操作中的变量。一个原子(atomic)类型就是一个原子操作可用的类型,它可以在没有锁(lock)的情况下做到线程安全(thread-safe)。
public class AddCountThread extends Thread {

    private AtomicInteger count = new AtomicInteger(0);

    @Override
    public void run() {
        for (int i = 0; i < 10000; i++) {
            System.out.println(count.incrementAndGet());
        }
    }

    public static void main(String[] args) {
        AddCountThread countThread = new AddCountThread();
        for (int i = 0; i < 5; i++) {
            new Thread(countThread).start();
        }
    }

}
2
3
4
5
6
7
8
9
10
11
12
13
14
15
16
17
18
19
# 3.3 禁止代码重排序
使用关键字volatile可以禁止代码重排序。在Java程序运行时,JIT(Just-In-Time Compiler,即时编译器)可以动态地改变程序代码运行的顺序,例如,有如下代码:
A代码-重耗时
B代码-轻耗时
C代码-重耗时
D代码-轻耗时
2
3
4
在多线程的环境中,JIT有可能进行代码重排,重排序后的代码顺序有可能如下:
B代码-轻耗时
D代码-轻耗时
A代码-重耗时
C代码-重耗时
2
3
4
这样做的主要原因是CPU流水线是同时执行这4个指令的,那么轻耗时的代码在很大程度上先执行完,以让出CPU流水线资源给其他指令,所以代码重排序是为了追求更高的程序运行效率。
重排序发生在没有依赖关系时,例如,对于上面的A、B、C、D代码,B、C、D代码不依赖A代码的结果,C、D代码不依赖A、B代码的结果,D代码不依赖A、B、C代码的结果,这种情况下就会发生重排序,如果代码之间有依赖关系,则代码不会重排序。
使用关键字volatile可以禁止代码重排序,例如,有如下代码:
A变量的操作
B变量的操作
volatile Z变量的操作
C变量的操作
D变量的操作
2
3
4
5
那么会有4种情况发生:
A、B可以重排序。
C、D可以重排序。
A、B不可以重排到Z的后面。
C、D不可以重排到Z的前面。
换言之,变量Z是一个"屏障",Z变量之前或之后的代码不可以跨越Z变量,这就是屏障的作用,关键字synchronized具有同样的特性。
规则:
关键字volatile之前的代码可以排序;
关键字volatile之后的代码可以排序;
关键字volatile之前的代码不可以重排到volatile之后;
关键字volatile之后的代码不可以重排到volatile之前;
关键字synchronized之前的代码不可以重排到synchronized之后;
关键字synchronized之后的代码不可以重排到synchronized之前。
# 四:线程间通信
# 4.1 暂停线程
暂停线程意味着此线程还可以恢复运行,在Java多线程中,可以使用 suspend() 方法暂停线程,使用 resume() 方法来恢复线程的执行。这两个方法已经废弃,想要实现对线程进行暂停与恢复的处理,可使用 wait()、notify()或notifyAll() 方法。
public class SuspendThread extends Thread {

    private long i = 0;

    @Override
    public void run() {
        while (true) {
            i++;
            try {
                Thread.sleep(100);
            } catch (InterruptedException e) {
                e.printStackTrace();
            }
        }
    }

    public long getI() {
        return i;
    }

    public static void main(String[] args) {
        try {
            SuspendThread thread = new SuspendThread();
            thread.start();
            Thread.sleep(500);

            // A段
            thread.suspend();
            System.out.println("A= " + System.currentTimeMillis() + " i=" + thread.getI());
            Thread.sleep(500);
            System.out.println("A= " + System.currentTimeMillis() + " i=" + thread.getI());

            // B段
            thread.resume();
            Thread.sleep(500);

            // C段
            thread.suspend();
            System.out.println("B= " + System.currentTimeMillis() + " i=" + thread.getI());
            Thread.sleep(500);
            System.out.println("B= " + System.currentTimeMillis() + " i=" + thread.getI());
        } catch (InterruptedException e) {
            e.printStackTrace();
        }
    }

}
2
3
4
5
6
7
8
9
10
11
12
13
14
15
16
17
18
19
20
21
22
23
24
25
26
27
28
29
30
31
32
33
34
35
36
37
38
39
40
41
42
43
44
45
46
47
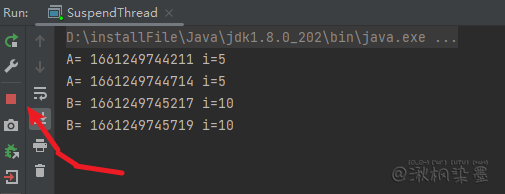
上面最后虽然main线程被销毁了,不过子线程暂停了,进程不会销毁,stop()方法用于销毁线程对象,如果想继续运行线程,则必须使用start()方法重新启动线程,而suspend()方法用于让线程不再执行任务,线程对象并不销毁,在当前所执行的代码处暂停,未来还可以恢复运行。
suspend()和resume()方法之所以被废弃主要有两个比较大的缺点。
缺点一:独占
如果上面两个方法使用不当,极易造成公共同步对象被独占,其他线程无法访问公共同步对象的结果。例如使用synchronized修饰的方法里面使用suspend()方法。
缺点二:数据不完整
上面两个方法使用不当,也容易出现线程暂停,进而导致数据不完整的情况。
补充:另外一种独占锁
public class Suspend2Thread {

    public static void main(String[] args) throws InterruptedException {
        Thread thread = new Thread(() -> {
            int i = 0;
            while (true) {
                System.out.println(i++);
                try {
                    Thread.sleep(100);
                } catch (InterruptedException e) {
                    throw new RuntimeException(e);
                }
            }
        });
        thread.start();
        Thread.sleep(200);
        thread.suspend();
        System.out.println("main end!");
    }

}
2
3
4
5
6
7
8
9
10
11
12
13
14
15
16
17
18
19
20
21
上面 main end 有一定概率打不出,出现这种情况的原因是当程序运行到 System.out.println(i) 方法内部停止时,同步锁是不释放的当前PrintStream对象的println()方法一直呈 "暂停" 状态,并且 "锁未释放",而main()方法中的代码 System.out.println("main end!") 也需要这把锁,main线程并未销毁,造成迟迟不能输出main end。
# 3.2 wait/notify 机制
拥有相同锁的线程才可以实现wait/notify机制,所以后面的描述中都是假定操作同一个锁。
wait()方法是Object类的方法,它的作用是使当前执行wait()方法的线程等待,在wait()所在的代码行处暂停执行,并释放锁,直到接到通知或被中断为止。在调用wait()之前,线程必须获得该对象的对象级别锁,即只能在同步方法或同步块中调用wait()方法。通过通知机制使某个线程继续执行wait()方法后面的代码时,对线程的选择是按照执行wait()方法的顺序确定的,并需要重新获得锁。如果调用wait()时没有持有适当的锁,则抛出IllegalMonitorStateException,它是RuntimeException的一个子类,因此不需要try-catch语句捕捉异常。
notify()也是Object类的方法,该方法要在同步方法或同步块中调用,即在调用前,线程必须获得锁,如果调用notify()时没有持有适当的锁,则会抛出IllegalMonitorStateException。该方法用来通知那些可能等待该锁的其他线程,如果有多个线程等待,则按照执行wait()方法的顺序对处于wait状态的线程发出一次通知(notify),并使该线程重新获取锁。需要说明的是,执行notify()方法后,当前线程不会马上释放该锁,呈wait状态的线程也并不能马上获取该对象锁,要等到执行notify()方法的线程将程序执行完,也就是退出synchronized同步区域后,当前线程才会释放锁,而呈wait状态的线程才可以获取该对象锁。当第一个获得了该对象锁的wait线程运行完毕后,它会释放该对象锁,此时如果没有再次使用notify语句,那么其他呈wait状态的线程因为没有得到通知,会继续处于wait状态。
总结:wait()方法使线程暂停运行,执行该方法后,锁被立即释放。而notify()方法通知暂停的线程继续运行,执行该方法后,不立即释放锁。sleep()为同步效果,不会释放锁。
当线程调用wait()方法后,再对该线程对象执行interrupt()方法会出现InterruptedException异常。
每调用一次notify()方法,只通知一个线程进行唤醒,唤醒的顺序与执行wait()方法的顺序一致。
public class MyThread1 extends Thread {

    private Object lock;

    public MyThread1(Object lock) {
        super();
        this.lock = lock;
    }

    @Override
    public void run() {
        try {
            synchronized (lock) {
                System.out.println("开始  wait time=" + System.currentTimeMillis());
                lock.wait();
                System.out.println("结束  wait time=" + System.currentTimeMillis());
            }
        } catch (InterruptedException e) {
            e.printStackTrace();
        }
    }
}


public class MyThread2 extends Thread {

    private Object lock;

    public MyThread2(Object lock) {
        super();
        this.lock = lock;
    }

    @Override
    public void run() {
        synchronized (lock) {
            System.out.println("开始notify time=" + System.currentTimeMillis());
            lock.notify();
            System.out.println("结束notify time=" + System.currentTimeMillis());
        }
    }
}


public class Test {

    public static void main(String[] args) throws InterruptedException {
        try {
            Object lock = new Object();

            MyThread1 t1 = new MyThread1(lock);
            t1.start();

            Thread.sleep(3000);

            MyThread2 t2 = new MyThread2(lock);
            t2.start();

        } catch (InterruptedException e) {
            e.printStackTrace();
        }
    }

}
2
3
4
5
6
7
8
9
10
11
12
13
14
15
16
17
18
19
20
21
22
23
24
25
26
27
28
29
30
31
32
33
34
35
36
37
38
39
40
41
42
43
44
45
46
47
48
49
50
51
52
53
54
55
56
57
58
59
60
61
62
63
64
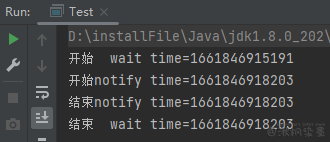
notifyAll()方法会按照执行wait()方法的倒序依次对其他线程进行唤醒。
注:唤醒的顺序是正序、倒序、随机,取决于具体的JVM实现,不是所有的JVM在执行notify()时都是按调用wait()方法的正序进行唤醒的,也不是所有的JVM在执行notifyAll()时都是按调用wait()方法的倒序进行唤醒的,具体的唤醒顺序依赖于JVM的具体实现。
带一个参数的wait(long)方法的功能是等待某一时间内是否有线程对锁进行notify()通知唤醒,如果超过这个时间则线程自动唤醒,能继续向下运行的前提是再次持有锁。
# 3.3 管道
通过管道进行线程间通信。Java语言提供了各种各样的输入/输出流,使我们能够很方便地对数据进行操作,其中管道流(pipe stream)是一种特殊的流,用于在不同线程间直接传送数据。一个线程发送数据到输出管道,另一个线程从输入管道中读数据。通过使用管道,实现不同线程间的通信,而无须借助于类似临时文件之类的东西。
Java JDK提供了4个类来使线程间可以进行通信,即字节流(PipedInputStream和PipedOutputStream)、字符流(PipedReader和PipedWriter)。
字节流
public class WriteData {

    public void writeMethod(PipedOutputStream out) {
        try {
            System.out.println("write :");
            for (int i = 0; i < 300; i++) {
                String outData = "" + (i + 1);
                out.write(outData.getBytes());
                System.out.print(outData);
            }
            System.out.println();
            out.close();
        } catch (IOException e) {
            e.printStackTrace();
        }
    }

}

public class ReadData {

    public void readMethod(PipedInputStream input) {
        try {
            System.out.println("read :");
            byte[] byteArray = new byte[20];
            int readLength = input.read(byteArray);
            while (readLength != -1) {
                String newData = new String(byteArray, 0, readLength);
                System.out.print(newData);
                readLength = input.read(byteArray);
            }
            System.out.println();
            input.close();
        } catch (IOException e) {
            e.printStackTrace();
        }
    }

}

public class ReadWriteTest {

    public static void main(String[] args) {
        try {
            WriteData writeData = new WriteData();
            ReadData readData = new ReadData();

            PipedInputStream inputStream = new PipedInputStream();
            PipedOutputStream outputStream = new PipedOutputStream();

            // 使两个管道之间建立通信连接,这样才可以对数据进行输出与输入
            // inputStream.connect(outputStream);
            outputStream.connect(inputStream);

            new Thread(() -> writeData.writeMethod(outputStream)).start();

            Thread.sleep(2000);

            new Thread(() -> readData.readMethod(inputStream)).start();

        } catch (IOException | InterruptedException e) {
            e.printStackTrace();
        }
    }

}
2
3
4
5
6
7
8
9
10
11
12
13
14
15
16
17
18
19
20
21
22
23
24
25
26
27
28
29
30
31
32
33
34
35
36
37
38
39
40
41
42
43
44
45
46
47
48
49
50
51
52
53
54
55
56
57
58
59
60
61
62
63
64
65
66

字符流
public class WriteData {

    public void writeMethod(PipedWriter out) {
        try {
            System.out.println("write :");
            for (int i = 0; i < 300; i++) {
                String outData = "" + (i + 1);
                out.write(outData);
                System.out.print(outData);
            }
            System.out.println();
            out.close();
        } catch (IOException e) {
            e.printStackTrace();
        }
    }

}

public class ReadWriteTest {

    public static void main(String[] args) {
        try {
            WriteData writeData = new WriteData();
            ReadData readData = new ReadData();

            PipedReader inputStream = new PipedReader();
            PipedWriter outputStream = new PipedWriter();

            // 使两个管道之间建立通信连接,这样才可以对数据进行输出与输入
            //inputStream.connect(outputStream);
            outputStream.connect(inputStream);

            new Thread(() -> writeData.writeMethod(outputStream)).start();

            Thread.sleep(2000);

            new Thread(() -> readData.readMethod(inputStream)).start();

        } catch (IOException | InterruptedException e) {
            e.printStackTrace();
        }
    }

}

public class ReadData {

    public void readMethod(PipedReader input) {
        try {
            System.out.println("read :");
            char[] byteArray = new char[20];
            int readLength = input.read(byteArray);
            while (readLength != -1) {
                String newData = new String(byteArray, 0, readLength);
                System.out.print(newData);
                readLength = input.read(byteArray);
            }
            System.out.println();
            input.close();
        } catch (IOException e) {
            e.printStackTrace();
        }
    }

}
2
3
4
5
6
7
8
9
10
11
12
13
14
15
16
17
18
19
20
21
22
23
24
25
26
27
28
29
30
31
32
33
34
35
36
37
38
39
40
41
42
43
44
45
46
47
48
49
50
51
52
53
54
55
56
57
58
59
60
61
62
63
64
65
66

# 3.4 join
在很多情况下,主线程创建并启动子线程,如果子线程要进行大量的耗时运算,主线程往往将早于子线程结束之前结束,这时如果主线程想等待子线程执行完成之后再结束,例如,当子线程处理一个数据,主线程要取得这个数据中的值时,就要用到join()方法了。方法join()的作用是等待线程对象销毁。
public class JoinTest extends Thread {

    @Override
    public void run() {
        try {
            int secondValue = (int) (Math.random() * 10000);
            System.out.println(secondValue);
            Thread.sleep(secondValue);
        } catch (InterruptedException e) {
            e.printStackTrace();
        }
    }

    public static void main(String[] args) {
        try {
            JoinTest joinTest = new JoinTest();
            joinTest.start();
            joinTest.join();

            System.out.println("等joinTest对象执行完毕后我再执行");
        } catch (InterruptedException e) {
            throw new RuntimeException(e);
        }
    }
}
2
3
4
5
6
7
8
9
10
11
12
13
14
15
16
17
18
19
20
21
22
23
24
25

join()方法的作用是使所属的线程对象x正常执行run()方法中的任务,而使当前线程z进行无限期的阻塞,等待线程x销毁后再继续执行线程z后面的代码,具有串联执行的效果。
join()方法具有使线程排队运行的效果,有些类似同步的运行效果,但是join()方法与synchronized的区别是join()方法在内部使用wait()方法进行等待,而synchronized关键字使用锁作为同步。
join()方法与interrupt()方法如果彼此遇到,则出现异常,不管先后顺序。
x.join(long)方法中的参数用于设定等待的时间,不管x线程是否执行完毕,时间到了并且重新获得了锁,则当前线程会继续向后运行。如果没有重新获得锁,则一直在尝试,直到获得锁为止。
join(long) 方法与sleep(long) 方法的区别:
join(long) 方法的功能在内部是使用wait(long) 方法来进行实现的,所以join(long) 方法具有释放锁的特点。
而Thread.sleep(long) 方法却不释放锁。
Thread类部分源码
public final synchronized void join(long millis) throws InterruptedException {
        long base = System.currentTimeMillis();
        long now = 0;

        if (millis < 0) {
            throw new IllegalArgumentException("timeout value is negative");
        }

        if (millis == 0) {
            while (isAlive()) {
                wait(0);
            }
        } else {
            while (isAlive()) {
                long delay = millis - now;
                if (delay <= 0) {
                    break;
                }
                wait(delay);
                now = System.currentTimeMillis() - base;
            }
        }
    }
2
3
4
5
6
7
8
9
10
11
12
13
14
15
16
17
18
19
20
21
22
23
public final synchronized void join(long millis, int nanos) throws InterruptedException方法的作用是等待该线程终止的时间最长为millis毫秒+nanos纳秒。如果参数nanos<0或者nanos>999999,则出现异常“nanosecond timeout value out of range”。
# 四:生命周期
# 4.1 概述
线程对象在不同的运行时期存在不同的状态,状态信息存在于State枚举类型中,
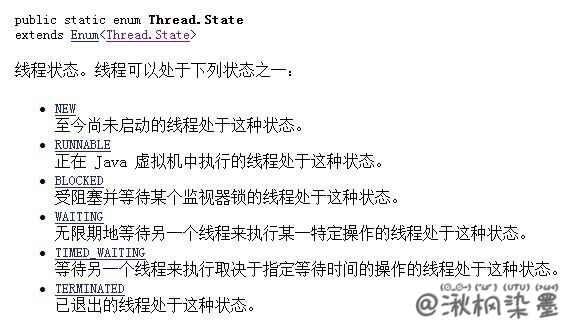
在调用与线程有关的方法后,线程会进入不同的状态。在这些状态之间,有些是双向切换的,例如,WAITING和RUNNING状态之间可以循环地进行切换;而有些是单向切换的,例如,线程销毁后并不能自动进入RUNNING状态。
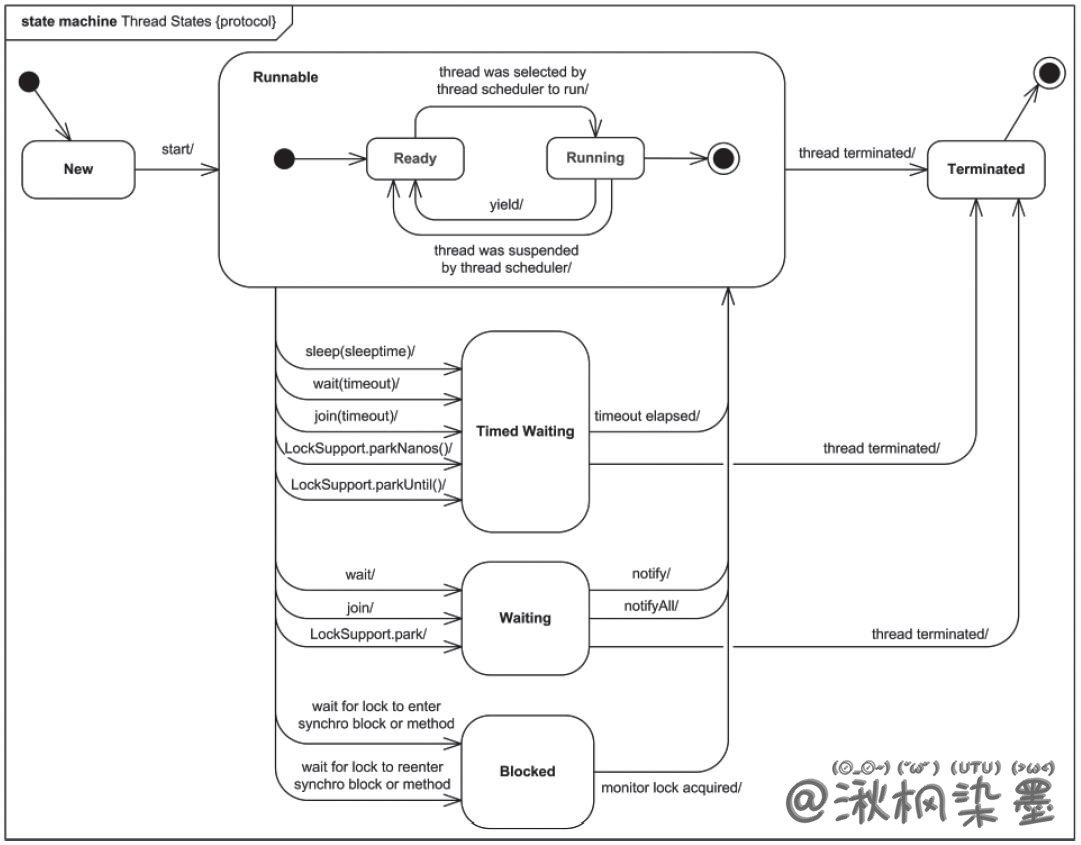
- 创建一个新的线程对象后,调用它的start()方法,系统会为此线程分配CPU资源,此时线程处于runnable(可运行)状态,这是一个准备运行的阶段。如果线程抢占到CPU资源,则此线程就处于running(运行)状态;
- runnable状态和running状态可相互切换,因为有可能线程运行一段时间后,其他高优先级的线程抢占了CPU资源,这时此线程就从running状态变成runnable状态。线程进入runnable状态大体分为如下4种情况。
- 调用sleep()方法后经过的时间超过了指定的休眠时间;
- 线程成功获得了试图同步的监视器;
- 线程正在等待某个通知,其他线程发出了通知;
- 处于挂起状态的线程调用了resume恢复方法。
- blocked是阻塞的意思,例如,如果遇到了一个I/O操作,此时当前线程由runnable运行状态转成blocked阻塞状态,等待I/O操作的结果。这时操作系统会把宝贵的CPU时间片分配给其他线程,当I/O操作结束后,线程由blocked状态结束,进入runnable状态,线程会继续运行后面的任务。出现阻塞的情况大体分为如下5种。
- 线程调用sleep()方法,主动放弃占用的处理器资源;
- 线程调用了阻塞式I/O方法,在该方法返回前,该线程被阻塞;
- 线程试图获得一个同步监视器,但该同步监视器正被其他线程所持有;
- 线程等待某个通知(notify);
- 程序调用了suspend()方法将该线程挂起。此方法容易导致死锁,应尽量避免使用该方法。
- run()方法运行结束后进入销毁阶段,整个线程执行完毕。
# 4.2 验证 NEW、RUNNABLE和TERMINATED
- NEW状态下,线程实例化后还从未执行start()方法;
- RUNNABLE状态下,线程进入运行状态;
- TERMINATED状态下,线程被销毁了。
public class NewTest extends Thread {

    public NewTest() {
        System.out.println("构造方法中的状态 Thread.currentThread().getState()=" + Thread.currentThread().getState());
        System.out.println("构造方法中的状态 this.getState()=" + this.getState());
    }

    @Override
    public void run() {
        System.out.println("run方法中的状态:" + Thread.currentThread().getState());
    }

    // NEW,
    // RUNNABLE,
    // TERMINATED,

    // BLOCKED,
    // WAITING,
    // TIMED_WAITING,

    public static void main(String[] args) throws InterruptedException {
        NewTest t = new NewTest();
        System.out.println("main方法中的状态1:" + t.getState());
        Thread.sleep(1000);
        t.start();
        Thread.sleep(1000);
        System.out.println("main方法中的状态2:" + t.getState());
    }

}
2
3
4
5
6
7
8
9
10
11
12
13
14
15
16
17
18
19
20
21
22
23
24
25
26
27
28
29
30

# 4.3 验证TIMED_WAITING
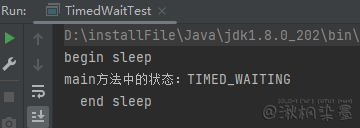
线程状态TIMED_WAITING代表线程执行了 Thread.sleep() 方法,呈等待状态,等待时间到达,然后继续向下运行。
public class TimedWaitTest extends Thread {

    @Override
    public void run() {
        try {
            System.out.println("begin sleep");
            Thread.sleep(10000);
            System.out.println("  end sleep");
        } catch (InterruptedException e) {
            e.printStackTrace();
        }
    }

    public static void main(String[] args) throws InterruptedException {
        TimedWaitTest t = new TimedWaitTest();
        t.start();
        Thread.sleep(1000);
        System.out.println("main方法中的状态:" + t.getState());

    }

}
2
3
4
5
6
7
8
9
10
11
12
13
14
15
16
17
18
19
20
21
22
# 4.4 验证BLOCKED
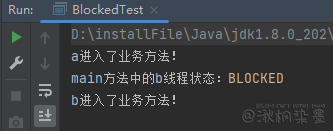
BLOCKED状态出现在某个线程在等待锁的时候。
public class BlockedTest {

    synchronized static public void serviceMethod() {
        try {
            System.out.println(Thread.currentThread().getName() + "进入了业务方法!");
            Thread.sleep(10000);
        } catch (InterruptedException e) {
            e.printStackTrace();
        }
    }

    public static void main(String[] args) throws InterruptedException {
        new Thread(BlockedTest::serviceMethod, "a").start();
        Thread.sleep(1000);

        Thread b = new Thread(BlockedTest::serviceMethod, "b");
        b.start();
        Thread.sleep(1000);

        System.out.println("main方法中的b线程状态:" + b.getState());
    }
}
2
3
4
5
6
7
8
9
10
11
12
13
14
15
16
17
18
19
20
21
22
# 4.5 验证WAITING
WAITING状态是线程执行了 Object.wait() 方法后所处的状态。
public class WaitingTest {

    synchronized public void test() {
        try {
            wait();
        } catch (InterruptedException e) {
            throw new RuntimeException(e);
        }
    }

    public static void main(String[] args) throws InterruptedException {
        WaitingTest w = new WaitingTest();
        Thread a = new Thread(w::test, "a");
        a.start();
        Thread.sleep(1000);
        System.out.println("main方法中a线程状态:" + a.getState());
    }

}
2
3
4
5
6
7
8
9
10
11
12
13
14
15
16
17
18
19

# 五:线程组
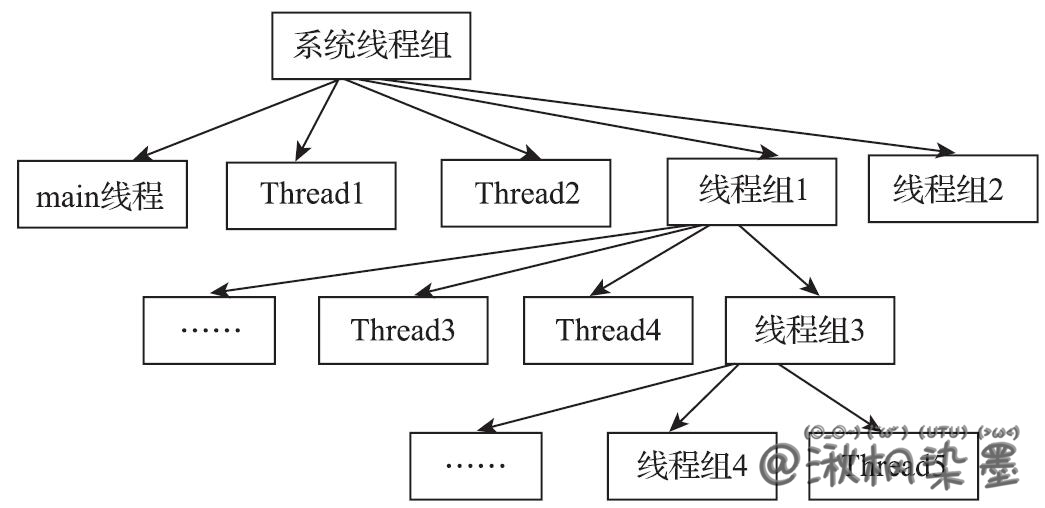
为了便于对某些具有相同功能的线程进行管理,可以把线程归属到某一个线程组中,线程组中既可以有线程对象,也可以有线程组,组中也可以有线程,这样的组织结构类似于树的形式,如下图。
# 5.1 线程对象关联线程组:一级关联
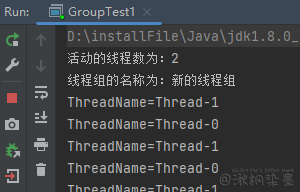
一级关联就是父对象中有子对象,但并不创建子孙对象,这种情况经常出现在开发中,例如,创建一些线程时为了有效地对这些线程进行组织管理,通常的情况是创建一个线程组,然后将部分线程归属到该组中,这样处理可以对零散的线程对象进行有效的组织与规划。
public class GroupTest1 {

    public static void main(String[] args) {
        Runnable runnable = () -> {
            try {
                while (!Thread.currentThread().isInterrupted()) {
                    System.out.println("ThreadName=" + Thread.currentThread().getName());
                    Thread.sleep(3000);
                }
            } catch (InterruptedException e) {
                throw new RuntimeException(e);
            }
        };

        ThreadGroup group = new ThreadGroup("新的线程组");

        new Thread(group, runnable).start();
        new Thread(group, runnable).start();

        System.out.println("活动的线程数为:" + group.activeCount());
        System.out.println("线程组的名称为:" + group.getName());
    }

}
2
3
4
5
6
7
8
9
10
11
12
13
14
15
16
17
18
19
20
21
22
23
24
# 5.2 线程对象关联线程组:多级关联
多级关联就是父对象中有子对象,子对象中再创建子对象,即子孙对象,但是这种写法在开发中不太常见。设计非常复杂的线程树结构反而不利于线程对象的管理,但JDK提供了支持多级关联的线程树结构,可以实现多级关联的关键代码是ThreadGroup类的构造方法:public ThreadGroup(ThreadGroup parent, String name)
public class GroupTest2 {

    public static void main(String[] args) {

        // 在main组中添加一个线程组A,然后在这个A组中添加线程对象Z
        // 方法activeGroupCount()和activeCount()的值不是固定的,是系统中环境的一个快照
        ThreadGroup mainGroup = Thread.currentThread().getThreadGroup();
        // 取得main主线程所在的线程组
        ThreadGroup group = new ThreadGroup(mainGroup, "A");
        Runnable runnable = () -> {
            try {
                System.out.println("runMethod!");
                // 线程必须在运行状态才可以受组管理
                Thread.sleep(10000);
            } catch (InterruptedException e) {
                e.printStackTrace();
            }
        };

        // 线程必须启动然后才归到组A中,因为在调用start()方法时会调用 group.add(this);
        new Thread(group, runnable, "Z").start();

        ThreadGroup[] listGroup = new ThreadGroup[Thread.currentThread().getThreadGroup().activeGroupCount()];
        Thread.currentThread().getThreadGroup().enumerate(listGroup);
        System.out.println("main线程中有多少个子线程组:" + listGroup.length + " 名字为:" + listGroup[0].getName());

        Thread[] listThread = new Thread[listGroup[0].activeCount()];
        // 方法enumerate()的作用是将线程组中的子线程组以复制的形式复制到listThread数组对象中
        listGroup[0].enumerate(listThread);
        System.out.println(listThread[0].getName());

    }

}
2
3
4
5
6
7
8
9
10
11
12
13
14
15
16
17
18
19
20
21
22
23
24
25
26
27
28
29
30
31
32
33
34
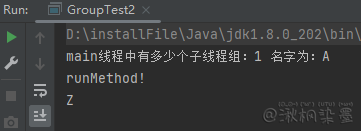
# 5.3 线程组自动归属特性
自动归属就是自动归到当前线程组中。
public class GroupTest3 {

    public static void main(String[] args) {
        // 方法activeGroupCount()取得当前线程组对象中的子线程组数量
        // 方法enumerate()的作用是将线程组中的子线程组以复制的形式复制到ThreadGroup[]数组对象中
        System.out.println("A处线程:" + Thread.currentThread().getName()
                + " 所属的线程组名为:" + Thread.currentThread().getThreadGroup().getName() + " "
                + " 中有线程组数量:" + Thread.currentThread().getThreadGroup().activeGroupCount());
        ThreadGroup group = new ThreadGroup("新的组");// 自动加到main组中
        System.out.println("B处线程:" + Thread.currentThread().getName()
                + " 所属的线程组名为:" + Thread.currentThread().getThreadGroup().getName() + " "
                + " 中有线程组数量:" + Thread.currentThread().getThreadGroup().activeGroupCount());
        ThreadGroup[] threadGroup = new ThreadGroup[Thread.currentThread().getThreadGroup().activeGroupCount()];
        Thread.currentThread().getThreadGroup().enumerate(threadGroup);
        for (ThreadGroup value : threadGroup) {
            System.out.println("第一个线程组名称为:" + value.getName());
        }
    }

}
2
3
4
5
6
7
8
9
10
11
12
13
14
15
16
17
18
19
20

# 5.4 获取根线程组
public class GroupTest4 {

    public static void main(String[] args) {
        System.out.println("线程:" + Thread.currentThread().getName() + " 所在的线程组名为:" + Thread.currentThread().getThreadGroup().getName());
        System.out.println("main线程所在的线程组的父线程组的名称是:" + Thread.currentThread().getThreadGroup().getParent().getName());
        System.out.println("main线程所在的线程组的父线程组的父线程组的名称是:" + Thread.currentThread().getThreadGroup().getParent().getParent().getName());
    }

}
2
3
4
5
6
7
8
9

程序运行结果说明JVM的根线程组是system,再取父线程组则出现空异常。
# 5.5 组内的线程批量停止
前面介绍了线程组ThreadGroup,并没有发现使用与不使用线程组ThreadGroup的区别。使用线程组ThreadGroup的优点是可以批量处理本组内的线程对象,例如,可以批量中断组中的线程。
public class GroupTest5 extends Thread {

    public GroupTest5(ThreadGroup group, String name) {
        super(group, name);
    }

    @Override
    public void run() {
        System.out.println("ThreadName=" + Thread.currentThread().getName() + "准备开始死循环了");
        while (!this.isInterrupted()) {
        }
        System.out.println("ThreadName=" + Thread.currentThread().getName() + "结束了");
    }

    public static void main(String[] args) throws InterruptedException {
        ThreadGroup group = new ThreadGroup("我的线程组");

        for (int i = 0; i < 5; i++) {
            new GroupTest5(group, "线程" + (i + 1)).start();
        }
        Thread.sleep(5000);
        group.interrupt();
        System.out.println("调用了interrupt()方法");
    }
}
2
3
4
5
6
7
8
9
10
11
12
13
14
15
16
17
18
19
20
21
22
23
24
25
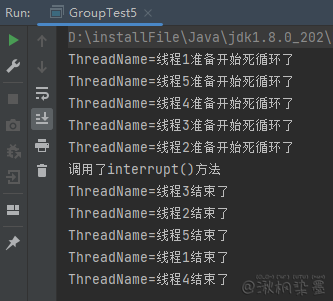
通过将线程归属到线程组中,当调用线程组ThreadGroup的interrupt()方法时可以中断该组中所有正在运行的线程。
# 5.6
public class GroupTest6 {

    public static void main(String[] args) {

        ThreadGroup mainGroup = Thread.currentThread().getThreadGroup();
        ThreadGroup groupA = new ThreadGroup(mainGroup, "A");
        ThreadGroup groupB = new ThreadGroup(groupA, "B");

        // 分配空间,但不一定全部用完
        ThreadGroup[] listGroup1 = new ThreadGroup[Thread.currentThread().getThreadGroup().activeGroupCount()];

        // 传入true是递归取得子组及子孙组
        Thread.currentThread().getThreadGroup().enumerate(listGroup1, true);

        for (ThreadGroup threadGroup : listGroup1) {
            if (threadGroup != null) {
                System.out.println(threadGroup.getName());
            }
        }

        ThreadGroup[] listGroup2 = new ThreadGroup[Thread.currentThread().getThreadGroup().activeGroupCount()];
        Thread.currentThread().getThreadGroup().enumerate(listGroup2, false);

        for (ThreadGroup threadGroup : listGroup2) {
            if (threadGroup != null) {
                System.out.println(threadGroup.getName());
            }
        }
    }

}
2
3
4
5
6
7
8
9
10
11
12
13
14
15
16
17
18
19
20
21
22
23
24
25
26
27
28
29
30
31
# 六:异常处理
当在线程中出现异常时,只能用run()方法中的catch语句进行处理,当有多个线程需要处理异常时,需要用每一个线程的run()方法中的catch语句分别进行处理,这样易造成代码严重冗余,所以可以使用 setDefaultUncaughtExceptionHandler() 和 setUncaughtExceptionHandler() 方法来集中处理线程的异常。
在Java多线程技术中,可以对多线程中的异常进行捕捉,使用的是 UncaughtExceptionHandler 接口,从而可以对发生的异常进行有效处理。
UncaughtExceptionHandler 接口的主要作用是当线程出现异常而终止时,JVM捕获到此情况,自动调用UncaughtExceptionHandler接口中的 void uncaughtException(Thread t,Throwable e) 方法来处理异常。
setUncaughtExceptionHandler() 方法的作用是对指定的线程对象设置默认的异常处理器。在Thread类中还可以使用 setDefaultUncaughtExceptionHandler() 方法对所有线程对象设置异常处理器。
# 6.1 setUncaughtExceptionHandler()
public class ExceptionTest1 {

    public static void main(String[] args) throws InterruptedException {
        Runnable runnable = () -> {
            String name = null;
            System.out.println(name.hashCode());
        };

        // 默认异常效果
        new Thread(runnable, "线程t1").start();
        Thread.sleep(2000);
        System.out.println("===============================");

        // 自定义异常效果
        Thread t1 = new Thread(() -> {
            String name = null;
            System.out.println(name.hashCode());
        }, "线程t2");

        t1.setUncaughtExceptionHandler((t, e) -> {
            System.out.println("线程:" + t.getName() + " 出现了异常:");
            e.printStackTrace();
        });
        t1.start();
    }

}
2
3
4
5
6
7
8
9
10
11
12
13
14
15
16
17
18
19
20
21
22
23
24
25
26
27

# 6.2 setDefaultUncaughtExceptionHandler()
public class ExceptionTest2 extends Thread {

    public ExceptionTest2(String name) {
        super(name);
    }

    @Override
    public void run() {
        String name = null;
        System.out.println(name.hashCode());
    }

    public static void main(String[] args) throws InterruptedException {
        ExceptionTest2.setDefaultUncaughtExceptionHandler((t, e) -> {
            System.out.println("线程:" + t.getName() + " 出现了异常:");
            e.printStackTrace();
        });

        new ExceptionTest2("线程t1").start();

        Thread.sleep(2000);
        System.out.println("===============================");

        new ExceptionTest2("线程t2").start();
    }
}
2
3
4
5
6
7
8
9
10
11
12
13
14
15
16
17
18
19
20
21
22
23
24
25
26
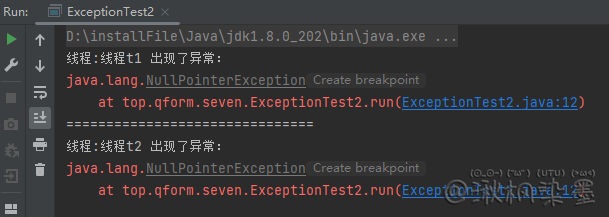
# 6.2 线程组内处理异常
public class ExceptionTest3 extends Thread {

    private String num;

    public ExceptionTest3(ThreadGroup group, String name, String num) {
        super(group, name);
        this.num = num;
    }

    @Override
    public void run() {
        int numInt = Integer.parseInt(num);
        while (true) {
            System.out.println("死循环中:" + Thread.currentThread().getName());
            try {
                Thread.sleep(1000);
            } catch (InterruptedException e) {
                throw new RuntimeException(e);
            }
        }
    }

    public static void main(String[] args) {
        ThreadGroup group = new ThreadGroup("我的线程组");

        for (int i = 0; i < 10; i++) {
            new ExceptionTest3(group, "线程" + (i + 1), "1").start();
        }

        new ExceptionTest3(group, "报错线程", "a").start();
    }

}
2
3
4
5
6
7
8
9
10
11
12
13
14
15
16
17
18
19
20
21
22
23
24
25
26
27
28
29
30
31
32
33
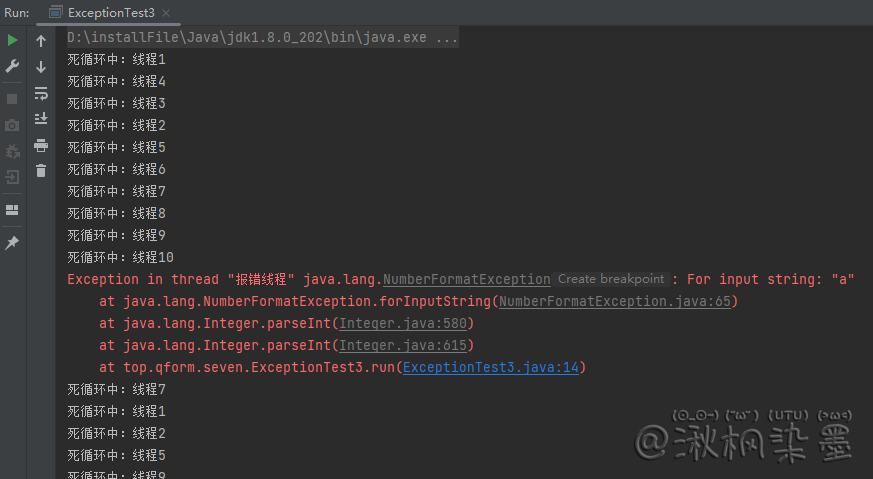
程序运行后,其中一个线程出现了异常,而其他线程一直以死循环的方式持续输出,从程序运行结果来看,在默认情况下,线程组中的一个线程出现异常后不会影响其他线程的运行。
如果想实现线程组内一个线程出现异常后全部线程都停止,则该如何实现呢?
public class MyThreadGroup1 extends ThreadGroup {

    public MyThreadGroup1(String name) {
        super(name);
    }

    @Override
    public void uncaughtException(Thread t, Throwable e) {
        super.uncaughtException(t, e);
        this.interrupt();
    }

}


public class ExceptionTest4 extends Thread {

    private String num;

    public ExceptionTest4(ThreadGroup group, String name, String num) {
        super(group, name);
        this.num = num;
    }

    @Override
    public void run() {
        int numInt = Integer.parseInt(num);
        while (!this.isInterrupted()) {
            System.out.println("死循环中:" + Thread.currentThread().getName());
            try {
                Thread.sleep(1000);
            } catch (InterruptedException e) {
                throw new RuntimeException(e);
            }
        }
    }

    public static void main(String[] args) {
        MyThreadGroup1 group = new MyThreadGroup1("我的线程组");

        for (int i = 0; i < 10; i++) {
            new ExceptionTest4(group, "线程" + (i + 1), "1").start();
        }

        new ExceptionTest4(group, "报错线程", "a").start();
    }

}
2
3
4
5
6
7
8
9
10
11
12
13
14
15
16
17
18
19
20
21
22
23
24
25
26
27
28
29
30
31
32
33
34
35
36
37
38
39
40
41
42
43
44
45
46
47
48
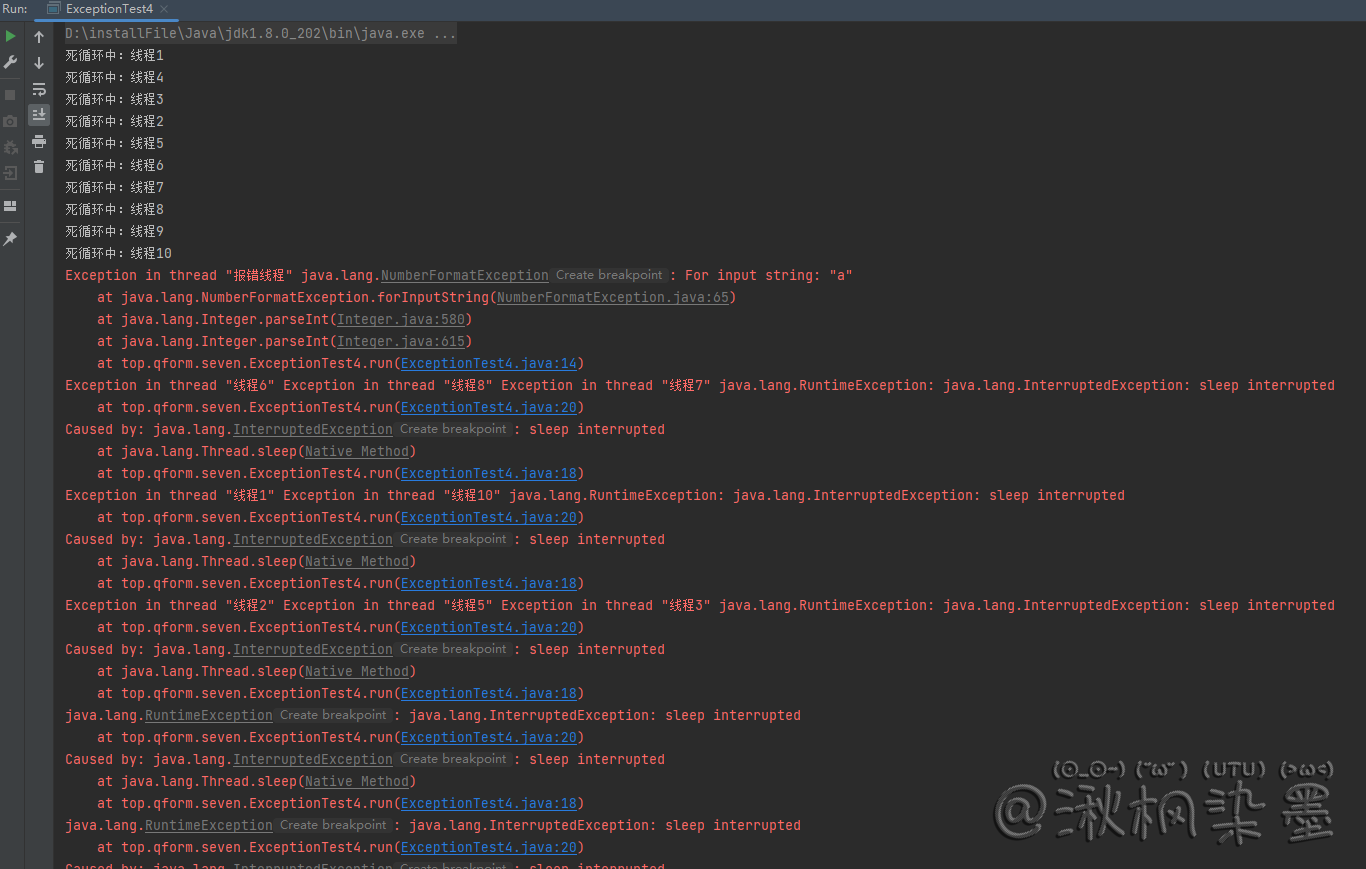
# 6.3 线程异常处理的优先性
public class MyThreadGroup2 extends ThreadGroup {

    public MyThreadGroup2(String name) {
        super(name);
    }

    @Override
    public void uncaughtException(Thread t, Throwable e) {
        super.uncaughtException(t, e);
        System.out.println("线程组的异常处理");
    }

}


public class ExceptionTest5 extends Thread {

    public ExceptionTest5(ThreadGroup group, String name) {
        super(group, name);
    }

    @Override
    public void run() {
        String name = null;
        System.out.println(name.hashCode());
    }

    public static void main(String[] args) throws InterruptedException {
        ExceptionTest5.setDefaultUncaughtExceptionHandler((t, e) -> {
            System.out.println("defaultUncaughtExceptionHandler的异常处理");
        });

        ExceptionTest5 thread = new ExceptionTest5(new MyThreadGroup2("临时线程组"), "优先级测试");

        thread.setUncaughtExceptionHandler((t, e) -> {
            System.out.println("uncaughtExceptionHandler的异常处理");
        });

        thread.start();
    }

}
2
3
4
5
6
7
8
9
10
11
12
13
14
15
16
17
18
19
20
21
22
23
24
25
26
27
28
29
30
31
32
33
34
35
36
37
38
39
40
41
42

可以看到 setUncaughtExceptionHandler 优先级是最高的,去除下面这段代码,继续执行
thread.setUncaughtExceptionHandler((t, e) -> {
	System.out.println("uncaughtExceptionHandler的异常处理");
});
2
3

可以发现 setDefaultUncaughtExceptionHandler 先执行,后执行线程组 uncaughtException 的内容。
综上,可以得出一个重要结论,如果调用过setUncaughtExceptionHandler()方法,则此异常处理器优先处理,其他异常处理器不再处理。
# 七:参考文献
- 《Java多线程编程核心技术 - 高宏岩》
