心灵鸡汤
有些事,想多了头疼,想通了心疼。所以,想不开就别想,得不到就别要,干嘛要委屈自己。放下包袱,忘却一切烦恼,开心度过每一天
# 一:ThreadLocal
变量值的共享可以使用public static变量的形式实现,所有的线程都使用同一个public static变量,那如何实现每一个线程都有自己的变量呢?JDK提供的ThreadLocal可用于解决这样的问题。
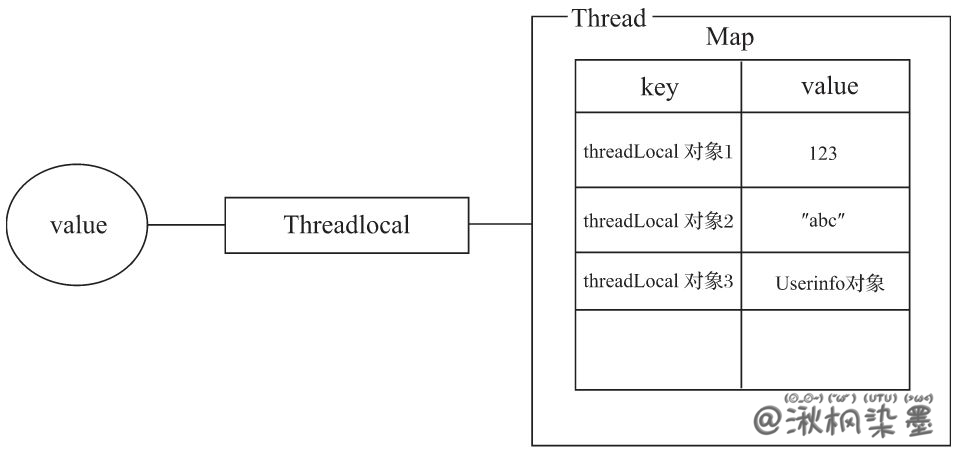
类ThreadLocal的主要作用是将数据放入当前线程对象中的Map中,这个Map是Thread类的实例变量。类ThreadLocal自己不管理、不存储任何数据,它只是数据和Map之间的桥梁,用于将数据放入Map中,执行流程如下:数据→ThreadLocal→currentThread()→Map
执行后每个线程中的Map存有自己的数据,Map中的key存储的是ThreadLocal对象,value就是存储的值。每个Thread中的Map值只对当前线程可见,其他线程不可以访问当前线程对象中Map的值。当前线程销毁,Map随之销毁,Map中的数据如果没有被引用、没有被使用,则随时GC收回。
线程、Map、数据之间的关系可以做以下类比:
人(Thread)随身带有兜子(Map),兜子(Map)里面有东西(value),这样,Thread随身也有自己的数据了,随时可以访问自己的数据了。
由于Map中的key不可以重复,所以一个ThreadLocal对象对应一个value。
# 1.1 get()与null
如果从未在Thread中的Map存储ThreadLocal对象对应的value值,则get()方法返回null。
public class ThreadLocalTest1 {

    public static ThreadLocal<String> tl = new ThreadLocal<>();

    public static void main(String[] args) {
        if (tl.get() == null) {
            System.out.println("从未放过值");
            tl.set("我的值");
        }
        System.out.println("first:" + tl.get());
        System.out.println("second:" + tl.get());
    }

}
2
3
4
5
6
7
8
9
10
11
12
13
14
从程序运行结果来看,第一次调用tl对象的get()方法时返回的值是null,通过调用set()方法赋值后顺利取出值并输出到控制台上。类ThreadLocal解决的是变量在不同线程的隔离性,也就是不同线程拥有自己的值,不同线程的值是可以通过ThreadLocal类进行保存的。
# 1.2 流程分析
下面从JDK源代码的角度分析一下ThreadLocal类执行存取操作的流程:
public class ThreadLocalTest2 {

    public static void main(String[] args) {
        ThreadLocal<String> local = new ThreadLocal<>();
        local.set("我是任意的值");
        System.out.println(local.get());
    }

}
2
3
4
5
6
7
8
9
- 执行
ThreadLocal.set("我是任意的值")代码时,ThreadLocal代码如下:
public class ThreadLocal<T> {
	/**
	 * 将此线程局部变量的当前线程副本设置为指定值。
	 * 大多数子类不需要重写此方法,仅依靠 initialValue 方法来设置线程局部变量的值。
	 */
	public void set(T value) {
		// 对象t就是main线程
        Thread t = Thread.currentThread();
        // 从main线程中获得ThreadLocalMap
        ThreadLocalMap map = getMap(t);
        // 不是第一次调用set方法时,map值不是null
        if (map != null)
            map.set(this, value);
        else
        	// 第一次调用set方法时,执行createMap()方法
            createMap(t, value);
    }
    // ... ...
}
2
3
4
5
6
7
8
9
10
11
12
13
14
15
16
17
18
19
- 代码
ThreadLocalMap map=getMap(t)中的getMap(t)的源代码如下:
/**
 * 获取与ThreadLocal关联的map,在 InheritableThreadLocal 中重写
 * @param t 当前线程
 */
ThreadLocalMap getMap(Thread t) {
	// 返回此线程中threadLocals变量对应的ThreadLocalMap对象
	return t.threadLocals;
}
2
3
4
5
6
7
8
- 声明变量
t.threadLocals的源代码如下:
public class Thread implements Runnable {
	// 与此线程有关的 ThreadLocal 值。 此映射由 ThreadLocal 类维护。
	ThreadLocal.ThreadLocalMap threadLocals = null;
	// ... ...
}
2
3
4
5
由上可知Thread中的
ThreadLocal.ThreadLocalMap默认为null,所以第一次向其存放数据时会调用createMap()方法来创建。createMap()方法的功能是创建一个新的ThreadLocalMap,并向这个新的ThreadLocalMap存储数据,ThreadLocalMap中的key就是当前的ThreadLocal对象,值就是传入的value。createMap()方法源代码如下:
/**
 * 创建与 ThreadLocal 关联的map,在 InheritableThreadLocal 中重写。
 * @param t 当前线程
 * @param firstValue map初始内容的值
 */
void createMap(Thread t, T firstValue) {
	t.threadLocals = new ThreadLocalMap(this, firstValue);
}
2
3
4
5
6
7
8
new ThreadLocalMap(this, firstValue)构造方法的源代码如下:
ThreadLocalMap(ThreadLocal<?> firstKey, Object firstValue) {
    table = new Entry[INITIAL_CAPACITY];
    int i = firstKey.threadLocalHashCode & (INITIAL_CAPACITY - 1);
    table[i] = new Entry(firstKey, firstValue);
    size = 1;
    setThreshold(INITIAL_CAPACITY);
}
2
3
4
5
6
7
在源代码中可以发现,ThreadLocal对象与firstValue被封装进Entry对象中,并放入table[]数组中。
- table[]数组的源代码如下:
public class ThreadLocal<T> {
	static class ThreadLocalMap {
    	static class Entry extends WeakReference<ThreadLocal<?>> {
			Object value;

            Entry(ThreadLocal<?> k, Object v) {
                super(k);
                value = v;
            }
    	}

		private Entry[] table;

		// ... ...
	}
	// ... ...
}
2
3
4
5
6
7
8
9
10
11
12
13
14
15
16
17
经过上面7个步骤,成功将value通过ThreadLocal放入当前线程currentThread()中的ThreadLocalMap对象中。
下面看看get()的执行流程。当执行 "System.out.println(local.get());" 代码时,ThreadLocal.get() 源代码如下:
/**
 * 返回此线程局部变量的当前线程副本中的值。如果变量没有当前线程的值,则首先将其初始化为调用 initialValue 方法返回的值。
 *
 * @return 当前线程的 thread-local 的值
 */
public T get() {
    Thread t = Thread.currentThread();
    // 从当前线程中获得Map
    ThreadLocalMap map = getMap(t);
    if (map != null) {
    	// 执行getEntry()以this作为key,获得对应的Entry对象
    	ThreadLocalMap.Entry e = map.getEntry(this);
    	if (e != null) {
    		@SuppressWarnings("unchecked")
    		// 从Entry对象中取得value并返回
    		T result = (T)e.value;
   			 return result;
    	}
    }
    return setInitialValue();
}
2
3
4
5
6
7
8
9
10
11
12
13
14
15
16
17
18
19
20
21
Q:为什么不能直接向Thread类中的ThreadLocalMap对象存取数据呢?
变量threadLocals默认是包级访问,所以不能直接从外部访问该变量,只有同包中的类可以访问threadLocals变量,而ThreadLocal和Thread恰好在同一个包中。
# 1.3 解决get()方法返回null的问题
在第一次调用Threadlocal类的get()方法时,返回值是null,怎样实现第一次调用get()不返回null呢?也就是说,怎样使其具有默认值的效果呢?覆盖 initialValue() 方法具有初始值,因为ThreadLocal.java中的initialValue()方法默认返回值是null,所以要在子类中进行重写,源代码如下:
/**
 * 返回此线程局部变量的当前线程的"初始值"。该方法将在线程第一次使用 get 方法访问变量时调用,除非该线程之前调用了 set 方法,在这种情况下,不会为该线程调用 initialValue 方法。
 * 通常,每个线程最多调用一次此方法,但在随后调用 remove 后调用 get 的情况下,它可能会再次调用。此实现仅返回 null;
 * 如果程序员希望线程局部变量具有除 null 以外的初始值,则必须将 ThreadLocal 子类化,并重写此方法。通常,将使用匿名内部类。
 *
 * @return 此 thread-local 的初始值
 */
protected T initialValue() {
	return null;
}
2
3
4
5
6
7
8
9
10
例子:
public class ThreadLocalExt extends ThreadLocal<String> {
    @Override
    protected String initialValue() {
        return "我是默认值";
    }
}

public class ThreadLocalTest3 {

    public static ThreadLocalExt tl = new ThreadLocalExt();

    public static void main(String[] args) {
        if (tl.get() == null) {
            System.out.println("从未放过值");
            tl.set("我的值");
        }
        System.out.println(tl.get());
        tl.remove();
        System.out.println(tl.get());
    }

}
2
3
4
5
6
7
8
9
10
11
12
13
14
15
16
17
18
19
20
21
22
# 二:InheritableThreadLocal
使用类InheritableThreadLocal可使子线程继承父线程的值。
# 2.1 ThreadLocal不能实现值继承
public class Tools {

    public static ThreadLocal<String> tl = new ThreadLocal<>();

}


public class InheritableTest1 {

    public static void main(String[] args) {
        try {
            for (int i = 0; i < 5; i++) {
                if (Tools.tl.get() == null) {
                    Tools.tl.set("此值是main线程放入的!");
                }
                System.out.println("       在Main线程中取值=" + Tools.tl.get());
                Thread.sleep(100);
            }

            Thread.sleep(5000);

            new Thread(() -> {
                try {
                    for (int i = 0; i < 5; i++) {
                        System.out.println("在ThreadA线程中取值=" + Tools.tl.get());
                        Thread.sleep(100);
                    }
                } catch (InterruptedException e) {
                    e.printStackTrace();
                }
            }).start();
        } catch (InterruptedException e) {
            e.printStackTrace();
        }
    }

}
2
3
4
5
6
7
8
9
10
11
12
13
14
15
16
17
18
19
20
21
22
23
24
25
26
27
28
29
30
31
32
33
34
35
36
37

main线程创建了ThreadA线程,所以main线程是ThreadA线程的父线程,从运行结果可以发现,main线程中的值并没有继承给ThreadA,所以ThreadLocal并不具有值继承特性,这时就要使用InheritableThreadLocal类进行替换了。
public class Tools {

    public static InheritableThreadLocal<String> tl = new InheritableThreadLocal<>();

}
2
3
4
5
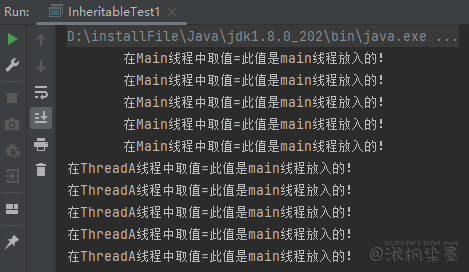
子ThreadA线程获取的值是从父线程main继承的。
# 2.1 流程分析
- 类InheritableThreadLocal的源代码:
public class InheritableThreadLocal<T> extends ThreadLocal<T> {
    /**
     * 计算此可继承线程局部变量的子项初始值,作为创建子线程时父项值的函数。
     * 在启动子线程之前,从父线程中调用此方法。
     * 此方法仅返回其输入参数,如果需要不同的行为,则应覆盖该方法。
     *
     * @param parentValue 父线程的值
     * @return 子线程的初始值
     */
    protected T childValue(T parentValue) {
        return parentValue;
    }

    /**
     * 获取与 ThreadLocal 关联的map
     *
     * @param t 当前线程
     */
    ThreadLocalMap getMap(Thread t) {
       return t.inheritableThreadLocals;
    }

    /**
     * 创建与 ThreadLocal 关联的map。
     *
     * @param t 当前线程
     * @param firstValue map初始内容的值
     */
    void createMap(Thread t, T firstValue) {
        t.inheritableThreadLocals = new ThreadLocalMap(this, firstValue);
    }
}
2
3
4
5
6
7
8
9
10
11
12
13
14
15
16
17
18
19
20
21
22
23
24
25
26
27
28
29
30
31
32
InheritableThreadLocal类的源代码中存在3个方法,这3个方法都是对父类ThreadLocal中的同名方法进行重写,但在源代码中并没有使用@Override进行标识,所以在初期分析时,流程是比较复杂的。
- 调用InheritableThreadLocal对象中的
set()方法其实就是调用ThreadLocal.java类中的set()方法,因为InheritableThreadLocal并没有重写set()方法。执行ThreadLocal.java类中的set()方法时,有两个方法已经被InheritableThreadLocal类重写了,分别是getMap(t)和createMap(t, value),一定要留意,所以在执行这两个方法时,调用的是InheritableThreadLocal类中重写的getMap(t)和createMap(t, value)这两个方法。
public class ThreadLocal<T> {

	public void set(T value) {
        Thread t = Thread.currentThread();
        ThreadLocalMap map = getMap(t);
        if (map != null)
            map.set(this, value);
        else
            createMap(t, value);
    }
    // ... ...
}
2
3
4
5
6
7
8
9
10
11
12
- 通过查看InheritableThreadLocal类中
getMap(Thread t)和createMap(Thread t,T firstValue)方法的源代码可以明确一个重要的点,那就是不再向Thread类中的ThreadLocal.ThreadLocalMap threadLocals存入数据了,而是向ThreadLocal.ThreadLocalMap inheritableThreadLocals存入数据,这两个对象在Thread.java类中的声明如下:
public class Thread implements Runnable {

    ThreadLocal.ThreadLocalMap threadLocals = null;

    ThreadLocal.ThreadLocalMap inheritableThreadLocals = null;

    // ... ...
}
2
3
4
5
6
7
8
那么子线程如何实现从父线程中的inheritableThreadLocals对象继承值呢?
- 这个实现的思路就是在创建子线程ThreadA时,子线程主动引用父线程main中的inheritableThreadLocals对象值,源代码如下:
public class Thread implements Runnable {

    /**
     * 初始化一个线程
     *
     * @param g 线程组
     * @param target run() 方法被调用的对象
     * @param name 新线程的名称
     * @param stackSize 新线程所需的堆栈大小,或为零表示要忽略此参数。
     * @param acc 要继承的 AccessControlContext,如果为 null,则为 AccessController.getContext()
     * @param inheritThreadLocals 如果为true, 从构造线程继承可继承thread-locals变量的初始值
     */
	private void init(ThreadGroup g, Runnable target, String name,
                      long stackSize, AccessControlContext acc,
                      boolean inheritThreadLocals) {
        // ... ...
        if (inheritThreadLocals && parent.inheritableThreadLocals != null)
            this.inheritableThreadLocals = ThreadLocal.createInheritedMap(parent.inheritableThreadLocals);
        // ... ...
    }

    /**
     * 创建继承的线程本地map的工厂方法。
     * 设计为仅从 Thread 构造函数调用。
     *
     * @param  parentMap 与父线程关联的map
     * @return 包含父级可继承绑定的map
     */
	static ThreadLocalMap createInheritedMap(ThreadLocalMap parentMap) {
        return new ThreadLocalMap(parentMap);
    }
}
2
3
4
5
6
7
8
9
10
11
12
13
14
15
16
17
18
19
20
21
22
23
24
25
26
27
28
29
30
31
32
方法init是被Thread的构造方法调用的,最后一个参数inheritThreadLocals代表当前线程对象是否会从父线程继承值,每一次都会继承值,因为这个值被永远传入true,传入true的源代码在 init(ThreadGroup g, Runnable target, String name, long stackSize) 方法中,源代码如下:
private void init(ThreadGroup g, Runnable target, String name, long stackSize) {
	init(g, target, name, stackSize, null, true);
}
2
3
new ThreadLocalMap(parentMap)核心代码
public class ThreadLocal<T> {

	static class ThreadLocalMap {

	private ThreadLocalMap(ThreadLocalMap parentMap) {
            Entry[] parentTable = parentMap.table;
            int len = parentTable.length;
            setThreshold(len);
            // 新建Entry[]数组
            table = new Entry[len];

            for (int j = 0; j < len; j++) {
                Entry e = parentTable[j];
                if (e != null) {
                    @SuppressWarnings("unchecked")
                    ThreadLocal<Object> key = (ThreadLocal<Object>) e.get();
                    if (key != null) {
                        Object value = key.childValue(e.value);
                        // 实例化新的Entry对象
                        Entry c = new Entry(key, value);
                        int h = key.threadLocalHashCode & (len - 1);
                        while (table[h] != null)
                            h = nextIndex(h, len);
                        // 将父线程中的数据复制到新数组中
                        table[h] = c;
                        size++;
                    }
                }
            }
        }
    }

}
2
3
4
5
6
7
8
9
10
11
12
13
14
15
16
17
18
19
20
21
22
23
24
25
26
27
28
29
30
31
32
33
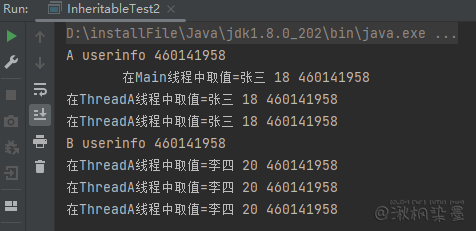
在构造方法的完整源代码算法中可以发现,子线程将父线程中的table对象以复制的方式赋值给子线程的table数组,这个过程是在创建Thread类对象时发生的,也就说明当子线程对象创建完毕后,子线程中的数据就是主线程中旧的数据,主线程使用新的数据时,子线程还是使用旧的数据,因为主子线程使用两个Entry[]对象数组各自存储自己的值。仅引入拷贝
public class Userinfo {

    private String userName;

    private int age;

    public String getUserName() {
        return userName;
    }

    public void setUserName(String userName) {
        this.userName = userName;
    }

    public int getAge() {
        return age;
    }

    public void setAge(int age) {
        this.age = age;
    }
}


public class Tools2 {

    public static InheritableThreadLocal<Userinfo> tl = new InheritableThreadLocal<>();

}

public class InheritableTest2 {

    public static void main(String[] args) {
        try {
            Userinfo userinfo = new Userinfo();
            System.out.println("A userinfo " + userinfo.hashCode());

            userinfo.setUserName("张三");
            userinfo.setAge(18);
            Tools2.tl.set(userinfo);

            System.out.println("       在Main线程中取值=" + Tools2.tl.get().getUserName() + " " + Tools2.tl.get().getAge() + " " + Tools2.tl.get().hashCode());
            Thread.sleep(100);

            new Thread(() -> {
                try {
                    for (int i = 0; i < 5; i++) {
                        Userinfo ui = Tools2.tl.get();
                        System.out.println("在ThreadA线程中取值=" + ui.getUserName() + " " + ui.getAge() + " " + ui.hashCode());
                        Thread.sleep(1000);
                    }
                } catch (InterruptedException e) {
                    e.printStackTrace();
                }
            }).start();

            Thread.sleep(2000);

            userinfo.setUserName("李四");
            userinfo.setAge(20);

            System.out.println("B userinfo " + userinfo.hashCode());
            Tools2.tl.set(userinfo);
        } catch (InterruptedException e) {
            e.printStackTrace();
        }
    }

}
2
3
4
5
6
7
8
9
10
11
12
13
14
15
16
17
18
19
20
21
22
23
24
25
26
27
28
29
30
31
32
33
34
35
36
37
38
39
40
41
42
43
44
45
46
47
48
49
50
51
52
53
54
55
56
57
58
59
60
61
62
63
64
65
66
67
68
69
# 2.2 重写 childValue()
public class InheritableThreadLocalExt extends InheritableThreadLocal<String> {

    @Override
    protected String initialValue() {
        return String.valueOf(new Date().getTime());
    }

    @Override
    protected String childValue(String parentValue) {
        return parentValue + " 在子线程加的!";
    }

}


public class InheritableTest3 {

    public static void main(String[] args) throws InterruptedException {
        InheritableThreadLocalExt ext = new InheritableThreadLocalExt();
        System.out.println("父线程默认值=" + ext.get());
        Thread.sleep(1000);
        new Thread(() -> System.out.println("子线程默认值=" + ext.get())).start();
    }

}
2
3
4
5
6
7
8
9
10
11
12
13
14
15
16
17
18
19
20
21
22
23
24
25

# 三:ReentrantLock
Java多线程可以使用synchronized关键字来实现线程间同步,不过JDK 1.5新增加的ReentrantLock类也能达到同样的效果,并且在扩展功能上更加强大,如具有嗅探锁定、多路分支通知等功能。
# 3.1 同步性
调用ReentrantLock对象的 lock() 方法获取锁,调用 unlock() 方法释放锁,这两个方法成对使用。想要实现同步某些代码,把这些代码放在lock()和unlock()之间即可。
public class MyService {

    private Lock lock = new ReentrantLock();

    public void methodA() {
        try {
            lock.lock();
            System.out.println("methodA begin ThreadName=" + Thread.currentThread().getName() + " time=" + System.currentTimeMillis());
            Thread.sleep(5000);
            System.out.println("methodA  end ThreadName=" + Thread.currentThread().getName() + " time=" + System.currentTimeMillis());
        } catch (InterruptedException e) {
            e.printStackTrace();
        } finally {
            lock.unlock();
        }
    }

    public void methodB() {
        try {
            lock.lock();
            System.out.println("methodB begin ThreadName=" + Thread.currentThread().getName() + " time=" + System.currentTimeMillis());
            Thread.sleep(5000);
            System.out.println("methodB  end ThreadName=" + Thread.currentThread().getName() + " time=" + System.currentTimeMillis());
        } catch (InterruptedException e) {
            e.printStackTrace();
        } finally {
            lock.unlock();
        }
    }
}


public class LockTest1 {

    public static void main(String[] args) {
        MyService service = new MyService();

        new Thread(() -> service.methodA(), "A").start();
        new Thread(() -> service.methodA(), "AA").start();

        new Thread(() -> service.methodB(), "B").start();
        new Thread(() -> service.methodB(), "BB").start();
    }

}
2
3
4
5
6
7
8
9
10
11
12
13
14
15
16
17
18
19
20
21
22
23
24
25
26
27
28
29
30
31
32
33
34
35
36
37
38
39
40
41
42
43
44
45
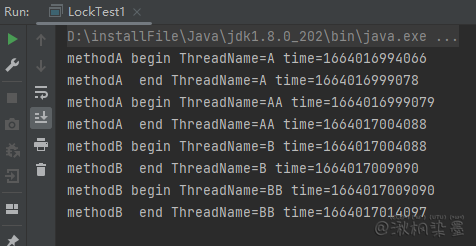
不管在一个方法还是多个方法的环境中,哪个线程持有锁,哪个线程就执行业务,其他线程只有等待锁被释放时再次争抢,抢到锁就开始执行业务,运行效果和使用synchronized关键字一样。线程之间执行的顺序是随机的。
# 3.2 await/signal
关键字synchronized与wait()、notify()/notifyAll()方法相结合可以实现wait/notify模式,ReentrantLock类也可以实现同样的功能,但需要借助于Condition对象。Condition类是JDK 5的技术,具有更好的灵活性,例如,可以实现多路通知功能,也就是在一个Lock对象中可以创建多个Condition实例,线程对象注册在指定的Condition中,从而可以有选择性地进行线程通知,在调度线程上更加灵活。
在使用notify()/notifyAll()方法进行通知时,被通知的线程由JVM进行选择,而方法notifyAll()会通知所有的waiting线程,没有选择权,会出现相当大的效率问题,但使用ReentrantLock结合Condition类可以实现 "选择性通知",这个功能是Condition类默认提供的。
Condition对象的作用是控制并处理线程的状态,它可以使线程呈wait状态,也可以让线程继续运行。
await()方法的作用使当前线程在接到通知或被中断之前一直处于等待wait状态。它和wait()方法的作用一样。必须在condition.await()方法调用之前调用lock.lock()代码获得锁。否则会报错 java.lang.IllegalMonitorStateException
public class AwaitTest1 {

    private Lock lock = new ReentrantLock();

    private Condition condition = lock.newCondition();

    public void await() {
        try {
            lock.lock();
            System.out.println("await start 时间为" + System.currentTimeMillis());
            condition.await();
            System.out.println("await end 时间为" + System.currentTimeMillis());
        } catch (InterruptedException e) {
            e.printStackTrace();
        } finally {
            lock.unlock();
        }
    }

    public void signal() {
        try {
            lock.lock();
            System.out.println("signal时间为" + System.currentTimeMillis());
            condition.signal();
        } finally {
            lock.unlock();
        }
    }

    public static void main(String[] args) throws InterruptedException {
        AwaitTest1 await = new AwaitTest1();
        new Thread(() -> await.await()).start();
        Thread.sleep(3000);
        await.signal();
    }

}
2
3
4
5
6
7
8
9
10
11
12
13
14
15
16
17
18
19
20
21
22
23
24
25
26
27
28
29
30
31
32
33
34
35
36
37
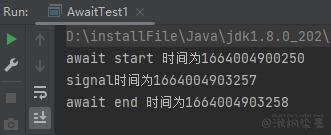
对比wait/notify模式api
| Object类 | Condition类 |
|---|---|
| wait() | await() |
| wait(long timeout) | await(long time, TimeUnit unit) |
| notify() | signal() |
| notifyAll() | signalAll() |
Q:await() 方法暂停线程运行的原理?
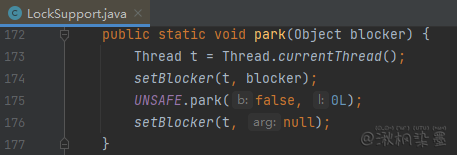
让执行await()方法的线程暂停运行是什么原理呢?其实并发包源代码内部执行了Unsafe类中的
public native void park(boolean isAbsolute, long time)方法,让当前线程呈暂停状态,方法参数isAbsolute代表是否为绝对时间,方法参数time代表时间值。如果对参数isAbsolute传入true,则第2个参数time时间单位为毫秒;如果传入false,则第2个参数时间单位为纳秒。
public class AwaitTest2 {

    public static void main(String[] args) throws InterruptedException, NoSuchFieldException, SecurityException, IllegalArgumentException, IllegalAccessException {
        Field f = Unsafe.class.getDeclaredField("theUnsafe");
        f.setAccessible(true);
        Unsafe unsafe = (Unsafe) f.get(null);

        // 如果传入true,则第2个参数时间单位为毫秒
        print(true, System.currentTimeMillis() + 3000, unsafe);

        // 3秒的纳秒值是3000000000
        // 3秒的微秒值是3000000
        // 3秒的毫秒值是3000
        // 3秒
        // 如果传入false,第2个参数时间单位为纳秒
        print(false, 3000000000L, unsafe);

        print(true, 0L, unsafe);

        print(false, 0L, unsafe);
    }

    /**
     * 不同参数的不同效果
     *
     * @param isAbsolute park方法的第一个参数
     * @param time       park方法的第二个参数
     * @param unsafe     Unsafe实例
     */
    private static void print(boolean isAbsolute, long time, Unsafe unsafe) {
        System.out.println("begin " + System.currentTimeMillis());
        System.currentTimeMillis();
        unsafe.park(isAbsolute, time);
        System.out.println("  end " + System.currentTimeMillis());
        System.out.println("========================================");
    }

}
2
3
4
5
6
7
8
9
10
11
12
13
14
15
16
17
18
19
20
21
22
23
24
25
26
27
28
29
30
31
32
33
34
35
36
37
38
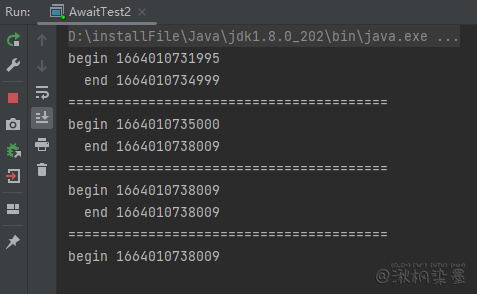
执行代码 unsafe.park(false, 0L) 后,当前线程呈暂停运行的状态,即实现了wait等待的效果,并发包源代码也执行了 unsafe.park(false,0L) 这样的形式,效果如下图
多个Condition可实现单独唤醒部分线程
public class ConditionTest {

    private Lock lock = new ReentrantLock();
    public Condition conditionA = lock.newCondition();
    public Condition conditionB = lock.newCondition();

    public void awaitA() {
        try {
            lock.lock();
            System.out.println("begin awaitA时间为" + System.currentTimeMillis() + " ThreadName=" + Thread.currentThread().getName());
            conditionA.await();
            System.out.println("  end awaitA时间为" + System.currentTimeMillis() + " ThreadName=" + Thread.currentThread().getName());
        } catch (InterruptedException e) {
            e.printStackTrace();
        } finally {
            lock.unlock();
        }
    }

    public void awaitB() {
        try {
            lock.lock();
            System.out.println("begin awaitB时间为" + System.currentTimeMillis() + " ThreadName=" + Thread.currentThread().getName());
            conditionB.await();
            System.out.println("  end awaitB时间为" + System.currentTimeMillis() + " ThreadName=" + Thread.currentThread().getName());
        } catch (InterruptedException e) {
            e.printStackTrace();
        } finally {
            lock.unlock();
        }
    }

    public void signalAll_A() {
        try {
            lock.lock();
            System.out.println("  signalAll_A时间为" + System.currentTimeMillis() + " ThreadName=" + Thread.currentThread().getName());
            conditionA.signalAll();
        } finally {
            lock.unlock();
        }
    }

    public void signalAll_B() {
        try {
            lock.lock();
            System.out.println("  signalAll_B时间为" + System.currentTimeMillis() + " ThreadName=" + Thread.currentThread().getName());
            conditionB.signalAll();
        } finally {
            lock.unlock();
        }
    }

    public static void main(String[] args) throws InterruptedException {
        ConditionTest condition = new ConditionTest();
        new Thread(() -> condition.awaitA()).start();
        new Thread(() -> condition.awaitB()).start();
        Thread.sleep(3000);
        condition.signalAll_A();
    }
}
2
3
4
5
6
7
8
9
10
11
12
13
14
15
16
17
18
19
20
21
22
23
24
25
26
27
28
29
30
31
32
33
34
35
36
37
38
39
40
41
42
43
44
45
46
47
48
49
50
51
52
53
54
55
56
57
58
59
60

使用Condition对象可以唤醒指定种类的线程,这是控制部分线程行为的方便方式。
# 3.3 公平锁与非公平锁
- 公平锁:采用先到先得的策略,每次获取锁之前都会检查队列里面有没有排队等待的线程,没有才会尝试获取锁,如果有就将当前线程追加到队列中。
- 非公平锁:采用 "有机会插队" 的策略,一个线程获取锁之前要先去尝试获取锁而不是在队列中等待,如果获取锁成功,则说明线程虽然是后启动的,但先获得了锁,这就是 "作弊插队" 的效果。如果获取锁没有成功,那么才将自身追加到队列中进行等待。
public class MyService2 {

    public Lock lock;

    public MyService2(boolean fair) {
        lock = new ReentrantLock(fair);
    }

    public void testMethod() {
        try {
            lock.lock();
            System.out.println("testMethod " + Thread.currentThread().getName());
            Thread.sleep(500);
            lock.unlock();
        } catch (InterruptedException e) {
            e.printStackTrace();
        }
    }

}


public class MyThread extends Thread {
    private MyService2 service;

    public MyThread(MyService2 service) {
        super();
        this.service = service;
    }

    public void run() {
        service.testMethod();
    }
}


public class LockTest2 {

    public static void main(String[] args) throws InterruptedException {
        MyService2 service = new MyService2(false);

        MyThread[] array1 = new MyThread[10];
        MyThread[] array2 = new MyThread[10];
        for (int i = 0; i < array1.length; i++) {
            array1[i] = new MyThread(service);
            array1[i].setName("array1+++" + (i + 1));
        }

        for (MyThread thread : array1) {
            thread.start();
        }

        for (int i = 0; i < array2.length; i++) {
            array2[i] = new MyThread(service);
            array2[i].setName("array2---" + (i + 1));
        }

        Thread.sleep(500);

        for (MyThread myThread : array2) {
            myThread.start();
        }

    }

}
2
3
4
5
6
7
8
9
10
11
12
13
14
15
16
17
18
19
20
21
22
23
24
25
26
27
28
29
30
31
32
33
34
35
36
37
38
39
40
41
42
43
44
45
46
47
48
49
50
51
52
53
54
55
56
57
58
59
60
61
62
63
64
65
66
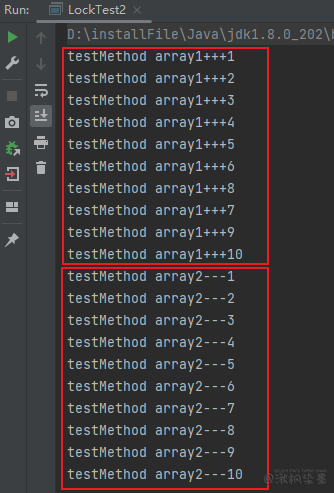
程序运行结果是+++在前,---在后,说明---没有任何机会抢到锁,这就是公平锁的特点。
把 MyService2 service = new MyService2(true) 修改为 MyService2 service = new MyService2(false)
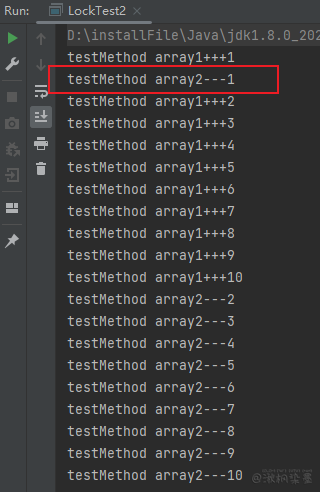
程序多次运行后,使用非公平锁时有可能在第2次输出---,说明后启动的线程先抢到了锁,这就是非公平锁的特点。
A线程持有锁后,B线程不能执行的原理是在内部执行了 unsafe.park(false, 0L) 代码;A线程释放锁后B线程可以运行的原理是当A线程执行 unlock() 方法时在内部执行了 unsafe.unpark(bThread),B线程得以继续运行。
# 3.4 ReentrantLock其他部分API
- public int getHoldCount():查询 "当前线程" 保持此锁定的个数,即调用lock()方法的次数。
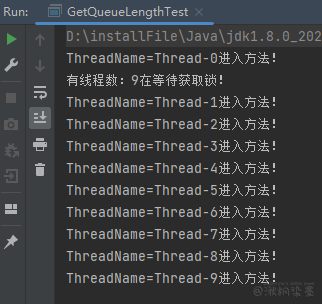
- public final int getQueueLength():返回正等待获取此锁的线程估计数,例如,这里有5个线程,其中1个线程长时间占有锁,那么调用getQueueLength()方法后,其返回值是4,说明有4个线程同时在等待锁的释放。
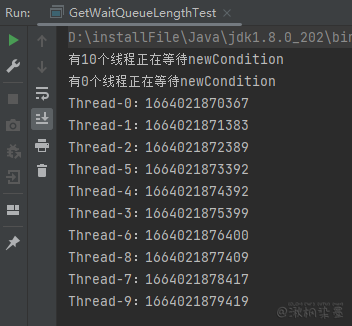
- public int getWaitQueueLength(Condition condition):返回等待与此锁相关的给定条件Condition的线程估计数。例如,这里有5个线程,每个线程都执行了同一个Condition对象的await()方法,则调用该方法时,其返回的值是5。
- public final boolean hasQueuedThread(Thread thread):查询指定的线程是否正在等待获取此锁,也就是判断参数中的线程是否在等待队列中。
- public final boolean hasQueuedThreads():查询是否有线程正在等待获取此锁,也就是等待队列中是否有等待的线程。
- public boolean hasWaiters(Condition condition):查询是否有线程正在等待与此锁有关的condition条件,也就是是否有线程执行了condition对象中的await()方法而呈等待状态。而
public int getWaitQueueLength(Condition condition)方法的作用是返回有多少个线程执行了condition对象中的await()方法而呈等待状态。 - public final boolean isFair():判断是不是公平锁。
- public boolean isHeldByCurrentThread():查询当前线程是否保持此锁。
- public boolean isLocked():查询此锁是否由任意线程保持,并没有释放。
- public void lockInterruptibly() throws InterruptedException:当某个线程尝试获得锁并且阻塞在lockInterruptibly()方法时,该线程可以被中断。
- public boolean tryLock():嗅探拿锁,如果当前线程发现锁被其他线程持有了,则返回false,程序继续执行后面的代码,而不是呈阻塞等待锁的状态。
- public boolean tryLock(long timeout, TimeUnit unit) throws InterruptedExceptionn:嗅探拿锁,如果当前线程发现锁被其他线程持有了,则返回false,程序继续执行后面的代码,而不是呈阻塞等待锁的状态。如果当前线程在指定的timeout内持有了锁,则返回值是true,超过时间则返回false。参数timeout代表当前线程抢锁的时间。
API例子
public class GetHoldCountTest {

    private ReentrantLock lock = new ReentrantLock(true);

    public void testMethod1() {
        System.out.println("A " + lock.getHoldCount());
        lock.lock();
        System.out.println("B " + lock.getHoldCount());
        testMethod2();
        System.out.println("F " + lock.getHoldCount());
        lock.unlock();
        System.out.println("G " + lock.getHoldCount());
    }

    public void testMethod2() {
        System.out.println("C " + lock.getHoldCount());
        lock.lock();
        System.out.println("D " + lock.getHoldCount());
        lock.unlock();
        System.out.println("E " + lock.getHoldCount());
    }

    public static void main(String[] args) throws InterruptedException {
        GetHoldCountTest holdCount = new GetHoldCountTest();
        holdCount.testMethod1();
    }

}
2
3
4
5
6
7
8
9
10
11
12
13
14
15
16
17
18
19
20
21
22
23
24
25
26
27
28
执行lock()方法进行锁重入导致count计数呈加1的效果,执行unlock()方法会使count呈减1的效果。
public class GetQueueLengthTest {

    public ReentrantLock lock = new ReentrantLock();

    public void serviceMethod1() {
        try {
            lock.lock();
            System.out.println("ThreadName=" + Thread.currentThread().getName() + "进入方法!");
            Thread.sleep(2000);
        } catch (InterruptedException e) {
            e.printStackTrace();
        } finally {
            lock.unlock();
        }
    }

    public static void main(String[] args) throws InterruptedException {
        final GetQueueLengthTest service = new GetQueueLengthTest();

        for (int i = 0; i < 10; i++) {
            new Thread(service::serviceMethod1).start();
        }

        Thread.sleep(1000);
        System.out.println("有线程数:" + service.lock.getQueueLength() + "在等待获取锁!");
    }
}
2
3
4
5
6
7
8
9
10
11
12
13
14
15
16
17
18
19
20
21
22
23
24
25
26
27
public class GetWaitQueueLengthTest {
    private ReentrantLock lock = new ReentrantLock();
    private Condition newCondition = lock.newCondition();

    public void waitMethod() {
        try {
            lock.lock();
            newCondition.await();
            Thread.sleep(1000);
            System.out.println(Thread.currentThread().getName() + ":" + System.currentTimeMillis());
        } catch (InterruptedException e) {
            e.printStackTrace();
        } finally {
            lock.unlock();
        }
    }

    public void notifyMethod() {
        try {
            lock.lock();
            System.out.println("有" + lock.getWaitQueueLength(newCondition) + "个线程正在等待newCondition");
            newCondition.signalAll();
            System.out.println("有" + lock.getWaitQueueLength(newCondition) + "个线程正在等待newCondition");
        } finally {
            lock.unlock();
        }
    }

    public static void main(String[] args) throws InterruptedException {
        final GetWaitQueueLengthTest service = new GetWaitQueueLengthTest();

        for (int i = 0; i < 10; i++) {
            new Thread(service::waitMethod).start();
        }

        Thread.sleep(2000);
        service.notifyMethod();
    }

}
2
3
4
5
6
7
8
9
10
11
12
13
14
15
16
17
18
19
20
21
22
23
24
25
26
27
28
29
30
31
32
33
34
35
36
37
38
39
40
public class HasQueuedThreadTest {

    private ReentrantLock lock = new ReentrantLock();

    public void waitMethod() {
        try {
            lock.lock();
            Thread.sleep(2000);
        } catch (InterruptedException e) {
            e.printStackTrace();
        } finally {
            lock.unlock();
        }
    }

    public static void main(String[] args) throws InterruptedException {
        final HasQueuedThreadTest service = new HasQueuedThreadTest();

        Runnable runnable = service::waitMethod;

        Thread threadA = new Thread(runnable);
        threadA.start();
        Thread.sleep(500);

        Thread threadB = new Thread(runnable);
        threadB.start();
        Thread.sleep(500);

        System.out.println(service.lock.hasQueuedThread(threadA));
        System.out.println(service.lock.hasQueuedThread(threadB));
    }
}
2
3
4
5
6
7
8
9
10
11
12
13
14
15
16
17
18
19
20
21
22
23
24
25
26
27
28
29
30
31
32
public class HasQueuedThreadsTest {

    private ReentrantLock lock = new ReentrantLock();

    public void waitMethod() {
        try {
            lock.lock();
            Thread.sleep(2000);
        } catch (InterruptedException e) {
            e.printStackTrace();
        } finally {
            lock.unlock();
        }
    }

    public static void main(String[] args) throws InterruptedException {
        final HasQueuedThreadsTest service = new HasQueuedThreadsTest();

        Runnable runnable = service::waitMethod;

        Thread threadA = new Thread(runnable);
        threadA.start();
        Thread.sleep(300);

        Thread threadB = new Thread(runnable);
        threadB.start();
        Thread.sleep(300);

        System.out.println(service.lock.hasQueuedThread(threadA));
        System.out.println(service.lock.hasQueuedThread(threadB));
        System.out.println(service.lock.hasQueuedThreads());
    }

}
2
3
4
5
6
7
8
9
10
11
12
13
14
15
16
17
18
19
20
21
22
23
24
25
26
27
28
29
30
31
32
33
34
public class HasWaitersTest {

    private ReentrantLock lock = new ReentrantLock();
    private Condition newCondition = lock.newCondition();

    public void waitMethod() {
        try {
            lock.lock();
            newCondition.await();
        } catch (InterruptedException e) {
            e.printStackTrace();
        } finally {
            lock.unlock();
        }
    }

    public void notityMethod() {
        try {
            lock.lock();
            System.out.println("有没有线程正在等待newCondition?" + lock.hasWaiters(newCondition) + " 线程数是多少?" + lock.getWaitQueueLength(newCondition));
            newCondition.signalAll();
        } finally {
            lock.unlock();
        }
    }

    public static void main(String[] args) throws InterruptedException {
        final HasWaitersTest service = new HasWaitersTest();

        for (int i = 0; i < 10; i++) {
            new Thread(service::waitMethod).start();
        }

        Thread.sleep(2000);
        service.notityMethod();
    }

}
2
3
4
5
6
7
8
9
10
11
12
13
14
15
16
17
18
19
20
21
22
23
24
25
26
27
28
29
30
31
32
33
34
35
36
37
38

public class IsFairTest {

    public static void main(String[] args) {
        ReentrantLock lock1 = new ReentrantLock(true);
        System.out.println(lock1.isFair());
        ReentrantLock lock2 = new ReentrantLock(false);
        System.out.println(lock2.isFair());
        ReentrantLock lock3 = new ReentrantLock();
        System.out.println(lock3.isFair());
    }

}
2
3
4
5
6
7
8
9
10
11
12
在默认情况下,ReentrantLock类使用的是非公平锁。
public class IsHeldByCurrentThread {

    private ReentrantLock lock = new ReentrantLock();

    public void serviceMethod() {
        try {
            System.out.println(lock.isHeldByCurrentThread());
            lock.lock();
            System.out.println(lock.isHeldByCurrentThread());
        } finally {
            lock.unlock();
        }
    }

    public static void main(String[] args) {
        final IsHeldByCurrentThread service = new IsHeldByCurrentThread();
        new Thread(service::serviceMethod).start();
    }

}
2
3
4
5
6
7
8
9
10
11
12
13
14
15
16
17
18
19
20
public class IsLockedTest {

    private ReentrantLock lock = new ReentrantLock();

    public void serviceMethod() {
        try {
            System.out.println(lock.isLocked());
            lock.lock();
            System.out.println(lock.isLocked());
        } finally {
            lock.unlock();
        }
    }

    public static void main(String[] args) throws InterruptedException {
        final IsLockedTest service = new IsLockedTest();
        new Thread(service::serviceMethod).start();
    }

}
2
3
4
5
6
7
8
9
10
11
12
13
14
15
16
17
18
19
20
public class LockInterruptiblyTest {

    private ReentrantLock lock = new ReentrantLock();

    public void testMethod() {
        lock.lock();
        System.out.println("begin " + Thread.currentThread().getName() + " " + System.currentTimeMillis());
        for (int i = 0; i < 100_000_000; i++) {
            Math.random();
        }
        System.out.println("  end " + Thread.currentThread().getName() + " " + System.currentTimeMillis());
        lock.unlock();
    }

    public static void main(String[] args) throws InterruptedException {
        LockInterruptiblyTest service = new LockInterruptiblyTest();
        new Thread(service::testMethod, "a").start();
        Thread.sleep(200);

        Thread b = new Thread(service::testMethod, "b");
        b.start();
        Thread.sleep(200);

        b.interrupt();
        System.out.println("是否能影响lock()的中断标志:" + b.isInterrupted());
    }

}
2
3
4
5
6
7
8
9
10
11
12
13
14
15
16
17
18
19
20
21
22
23
24
25
26
27
28
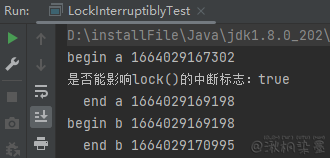
interrupt() 并没有能影响 lock() 的中断标志也没被中断,程序正常执行,把 lock.lock() 改成 lock.lockInterruptibly() 可以看到下面异常中断。需要在 lock.lockInterruptibly() 方法执行前执行 interrupt() 才能有下面的效果。

public class TryLockTest1 {

    private ReentrantLock lock = new ReentrantLock();

    public void waitMethod() {
        if (lock.tryLock()) {
            System.out.println(Thread.currentThread().getName() + "获得锁");
        } else {
            System.out.println(Thread.currentThread().getName() + "没有获得锁");
        }
    }

    public static void main(String[] args) throws InterruptedException {
        final TryLockTest1 service = new TryLockTest1();

        Runnable runnableRef = service::waitMethod;

        new Thread(runnableRef, "A").start();
        new Thread(runnableRef, "B").start();
    }
}
2
3
4
5
6
7
8
9
10
11
12
13
14
15
16
17
18
19
20
21
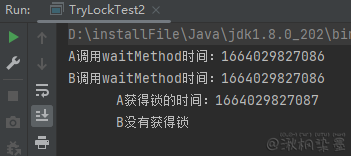
public class TryLockTest2 {

    private ReentrantLock lock = new ReentrantLock();

    public void waitMethod() {
        try {
            if (lock.tryLock(3, TimeUnit.SECONDS)) {
                System.out.println("      " + Thread.currentThread().getName() + "获得锁的时间:" + System.currentTimeMillis());
                Thread.sleep(10000);
            } else {
                System.out.println("      " + Thread.currentThread().getName() + "没有获得锁");
            }
        } catch (InterruptedException e) {
            e.printStackTrace();
        } finally {
            if (lock.isHeldByCurrentThread()) {
                lock.unlock();
            }
        }
    }

    public static void main(String[] args) {
        final TryLockTest2 service = new TryLockTest2();

        Runnable runnableRef = () -> {
            System.out.println(Thread.currentThread().getName() + "调用waitMethod时间:" + System.currentTimeMillis());
            service.waitMethod();
        };

        new Thread(runnableRef, "A").start();
        new Thread(runnableRef, "B").start();
    }
}
2
3
4
5
6
7
8
9
10
11
12
13
14
15
16
17
18
19
20
21
22
23
24
25
26
27
28
29
30
31
32
33
# 3.5 Condition其他部分API
- public boolean await(long time, TimeUnit unit) throws InterruptedException:和
public final native void wait(long timeout)方法一样,都具有自动唤醒线程的功能。 - public long awaitNanos(long nanosTimeout) throws InterruptedException:和
public final native void wait(long timeout)方法一样,都具有自动唤醒线程的功能,时间单位是纳秒(ns)。 - public boolean awaitUntil(Date deadline) throws InterruptedException:在指定的Date结束等待。
- public void awaitUninterruptibly():实现线程在等待的过程中,不允许被中断。
API例子
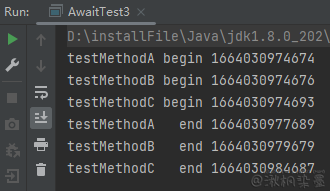
public class AwaitTest3 {

    private ReentrantLock lock = new ReentrantLock();

    private Condition condition = lock.newCondition();

    public void testMethodA() {
        try {
            lock.lock();
            System.out.println("testMethodA begin " + System.currentTimeMillis());
            condition.await(3, TimeUnit.SECONDS);
            System.out.println("testMethodA   end " + System.currentTimeMillis());
            lock.unlock();
        } catch (InterruptedException e) {
            e.printStackTrace();
        }
    }

    public void testMethodB() {
        try {
            lock.lock();
            System.out.println("testMethodB begin " + System.currentTimeMillis());
            // 5000000000L====5s
            condition.awaitNanos(5000000000L);
            System.out.println("testMethodB   end " + System.currentTimeMillis());
            lock.unlock();
        } catch (InterruptedException e) {
            e.printStackTrace();
        }
    }

    public void testMethodC() {
        try {
            Calendar calendarRef = Calendar.getInstance();
            calendarRef.add(Calendar.SECOND, 10);
            lock.lock();
            System.out.println("testMethodC begin " + System.currentTimeMillis());
            condition.awaitUntil(calendarRef.getTime());
            System.out.println("testMethodC   end " + System.currentTimeMillis());
        } catch (InterruptedException e) {
            e.printStackTrace();
        } finally {
            lock.unlock();
        }
    }

    public static void main(String[] args) {
        AwaitTest3 service = new AwaitTest3();
        new Thread(service::testMethodA).start();
        new Thread(service::testMethodB).start();
        new Thread(service::testMethodC).start();
    }

}
2
3
4
5
6
7
8
9
10
11
12
13
14
15
16
17
18
19
20
21
22
23
24
25
26
27
28
29
30
31
32
33
34
35
36
37
38
39
40
41
42
43
44
45
46
47
48
49
50
51
52
53
54
public class AwaitUninterruptiblyTest {

    private ReentrantLock lock = new ReentrantLock();
    private Condition condition = lock.newCondition();

    public void testMethod() {
        try {
            lock.lock();
            System.out.println("wait begin");
            condition.await();
            System.out.println("wait   end");
        } catch (InterruptedException e) {
            e.printStackTrace();
        } finally {
            lock.unlock();
        }
    }

    public static void main(String[] args) throws InterruptedException {
        AwaitUninterruptiblyTest service = new AwaitUninterruptiblyTest();
        Thread thread = new Thread(service::testMethod);
        thread.start();

        Thread.sleep(3000);
        thread.interrupt();
    }

}
2
3
4
5
6
7
8
9
10
11
12
13
14
15
16
17
18
19
20
21
22
23
24
25
26
27
28

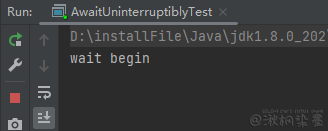
由程序运行结果可以看出,await()方法是可以被中断的。将 condition.await() 修改为 condition.awaitUninterruptibly(),可以得到下面的结果
# 四:ReentrantReadWriteLock
ReentrantLock类具有完全互斥排他的效果,同一时间只有一个线程在执行ReentrantLock.lock()方法后面的任务,这样做虽然保证了同时写实例变量的线程安全性,但效率是非常低下的,所以JDK提供了一种读写锁——ReentrantReadWriteLock类,使用它可以在进行读操作时不需要同步执行,提升运行速度,加快运行效率。
读写锁有两个锁:一个是读操作相关的锁,也称共享锁;另一个是写操作相关的锁,也称排他锁。
读锁之间不互斥,读锁和写锁互斥,写锁与写锁互斥,因此只要出现写锁,就会出现互斥同步的效果。
读操作是指读取实例变量的值,写操作是指向实例变量写入值。
# 4.1 读读共享
public class ReadReadTest {

    private ReentrantReadWriteLock lock = new ReentrantReadWriteLock();

    public void testMethod1() {
        try {
            lock.readLock().lock();
            System.out.println("begin " + Thread.currentThread().getName() + " " + System.currentTimeMillis());
            Thread.sleep(4000);
            System.out.println("  end " + Thread.currentThread().getName() + " " + System.currentTimeMillis());
            lock.readLock().unlock();
        } catch (InterruptedException e) {
            e.printStackTrace();
        }
    }

    public static void main(String[] args) {
        ReadReadTest read = new ReadReadTest();
        new Thread(read::testMethod1).start();
        new Thread(read::testMethod1).start();
    }

}
2
3
4
5
6
7
8
9
10
11
12
13
14
15
16
17
18
19
20
21
22
23
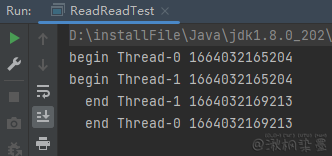
从控制台输出的时间来看,两个线程几乎同时进入lock()方法后面的代码,共耗时4s,说明在此使用 lock.readLock() 读锁可以提高程序运行效率,允许多个线程同时执行lock()方法后面的代码。
在此示例中,完全不使用锁,也可以实现异步运行的效果,那为什么要使用锁呢?这是因为有可能有第三个线程在执行写操作,在执行写操作时,这两个读操作就不能与写操作同时运行了,必须在写操作结束后,这两个读操作才可以同时运行,避免了出现非线程安全问题,而且提高了运行效率。
# 4.2 写写互斥
public class WriteWriteTest {

    private ReentrantReadWriteLock lock = new ReentrantReadWriteLock();

    public void write() {
        try {
            lock.writeLock().lock();
            System.out.println("获得写锁" + Thread.currentThread().getName() + " " + System.currentTimeMillis());
            Thread.sleep(10000);
        } catch (InterruptedException e) {
            e.printStackTrace();
        } finally {
            lock.writeLock().unlock();
        }
    }

    public static void main(String[] args) {
        WriteWriteTest read = new WriteWriteTest();
        new Thread(read::write).start();
        new Thread(read::write).start();
    }

}
2
3
4
5
6
7
8
9
10
11
12
13
14
15
16
17
18
19
20
21
22
23

使用写锁代码 lock.writeLock() 的效果是同一时间只允许一个线程执行lock()方法后面的代码。
# 4.3 读写/写读互斥
public class ReadWriteTest {

    private ReentrantReadWriteLock lock = new ReentrantReadWriteLock();

    public void read() {
        try {
            lock.readLock().lock();
            System.out.println("获得读锁" + Thread.currentThread().getName() + " " + System.currentTimeMillis());
            Thread.sleep(10000);
        } catch (InterruptedException e) {
            e.printStackTrace();
        } finally {
            lock.readLock().unlock();
        }
    }

    public void write() {
        try {
            lock.writeLock().lock();
            System.out.println("获得写锁" + Thread.currentThread().getName() + " " + System.currentTimeMillis());
            Thread.sleep(10000);
        } catch (InterruptedException e) {
            e.printStackTrace();
        } finally {
            lock.writeLock().unlock();
        }
    }

    public static void main(String[] args) throws InterruptedException {
        ReadWriteTest rw = new ReadWriteTest();
        new Thread(() -> rw.read()).start();
        Thread.sleep(1000);
        new Thread(() -> rw.write()).start();
    }

}
2
3
4
5
6
7
8
9
10
11
12
13
14
15
16
17
18
19
20
21
22
23
24
25
26
27
28
29
30
31
32
33
34
35
36
修改main方法中线程的顺序
public static void main(String[] args) throws InterruptedException {
    ReadWriteTest rw = new ReadWriteTest();
    new Thread(() -> rw.write()).start();
    Thread.sleep(1000);
    new Thread(() -> rw.read()).start();
}
2
3
4
5
6

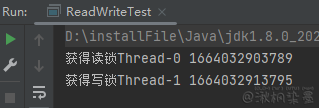
说明 "读写" 操作是互斥的,而且 "写读" 操作也是互斥的。
总结:只要出现 "写操作",就是互斥的。
# 五:参考文献
- 《Java多线程编程核心技术 - 高宏岩》
